Pages

June 23, 2015

Refurbishing Furniture


I know I've mentioned before, how I'm not good at decorating.  I am, however, good at projects. Or at least I like to think I am. 

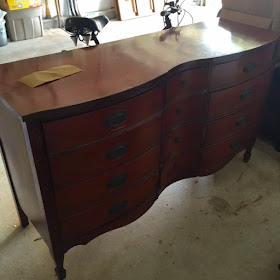
I have to give all the credit to my neighbor and good friend, Emily, for guiding me through this process. We went to Goodwill just on a whim before heading to an antique store.  Lucky we did because we found everything I was looking for there.  Well, technically, everything Emily knew I was looking for. She spotted this dresser and grabbed the claim ticket before anyone else did.  When I first saw it I was like, oh that's nice.  But she was in LOVE with it. Then she showed me some pictures of how we could refurbish it and I began to see what she had in mind. 


This wasn't exactly a quick project because, you know, life and all.  But I was able to sand it and get it painted in about a months time.  Obviously it could have been done sooner if I was more ambitious.
I sanded all the original finish off but you don't actually have to do that.  You just need to scratch it up  with some sand paper.  I used rough sand paper.  Then apply the paint in the color you choose.


After being painted, I just needed Emily to come help me distress it.  I've never done it before and she has so I didn't want to try it on my own.

To distress, just take a piece of rough sand paper (wear some gloves) and sand off the paint in areas that would normally show wear over time.  Like under or over the handles.  Corners, edges, that sort of thing.  You can do as much or as little as you like.  Start small and just keep stepping back to look it over.


The finished piece.  I am in love with it now.  I don't have the vision that Emily has so I wasn't able to see the finished product when I looked at the dresser at Goodwill.  She also picked out the lamps at Goodwill and the mirror was one she had that she let me have.

We left the top the original color and didn't need to finish it at all.  All we did was use this amazing solution that Emily had heard about and it worked wonders for the top.  It brought back the luster and shine, it conditioned it and it made all marks all but disappear. Ready for the amazing recipe? Here it goes.

1 part olive oil
1 part white vinegar

That's it.  Seriously.

Cost associated with the project.
$150 for the dresser at Goodwill
$15 paint
I already had sandpaper and paintbrushes.
I also used a mask for the sanding portion, I think it was $10 or less.

June 18, 2015

Peanut Butter Crinkle Cookies


So there I was, harmlessly reading a fiction novel, the main character starts eating peanut butter cookies and I couldn't for the life of me, get it out of my head.  It's been a awhile since I've made cookies so why not?

My favorite cookie texture is chewy.  I know some of you like cake like cookies and believe me, I wouldn't turn one of those down.  But I prefer chewy.  This cookie is chewy, and big and has lots of sweet peanut butter flavor.

The nice thing about peanut butter cookies, they're great for outdoor picnics and other potentially hot days since there isn't anything that will melt and be messy.

Enjoy!


Peanut Butter Crinkle Cookies
Recipe from AverieCooks


Ingredients
  • 1 large egg
  • 1/2 cup creamy peanut butter (not natural or homemade)
  • 1/2 cup (1 stick) unsalted butter
  • 1/2 cup granulated sugar
  • 1/2 cup light brown sugar
  • 1 tsp vanilla extract
  • 1 1/4 cups all-purpose flour
  • 1 tsp baking soda
  • pinch of salt, to taste (optional)
  • granulated sugar, to roll the dough in before baking.
Cooking Directions
  1. Mix together the first 6 ingredients until smooth in the bowl of your stand mixer, or use a hand mixer.
  2. Add the dry ingredients and mix to combine.
  3. Use a 1/4 cup measuring cup or a large cookie scoop, put the dough in your hand and roll into a ball, then flatten slightly and put on a plate. Do this with all the dough (about 12 balls) and put them all on a plate. Cover with plastic wrap and refrigerate for at least 2 hours.
  4. Preheat the oven to 350º
  5. Line the cookie sheet with a silpat or parchment paper.
  6. Remove the cookies from the oven and roll in the extra granulated sugar.
  7. Bake the cookies for about 12 minutes or until the edges of the cookies are just turning light brown. Remove to a rack and let cool.
  8. **Make sure the dough is nice and cool before baking, also allow room for the cookies to spread out while baking.

June 13, 2015

Scottish Jam and Cherry Tea

As a result of my recent World Market shopping trip, I found more cool stuff to try.  I shouldn't be allowed to go there and I do limit myself to only go every so often.  But I love that store so much.  I haven't been in the kitchen much this past week.  This summer is CRAZY as I'm sure yours is too.  I'll try to be better about it. 


The Cherry Green Tea above was amazing!  If I ever find that tea anywhere more convenient to my house I'm going to buy a dozen of them!


I use this preserve on my English muffins all the time.  I love it.  The fact that it's made in Scotland and I love all things Scottish doesn't hurt either. :)

June 5, 2015

Blueberry Lemonade


This will be one of my summer drinks this year.  Seriously, it's so refreshing. The blueberry flavor and the lemon flavor meld so nicely without one flavor overpowering the other. Perfect on a hot day by the pool or after a long day doing yard work.

It cools you right down.

It makes you want more.

I'm gonna go get some.

Blueberry Lemonade
Recipe from Damn Delicious


Ingredients
  • 1/2 cup fine granulated sugar
  • 1 cup blueberries
  • 3/4 cup fresh squeezed lemon juice
Cooking Directions
  1. in a medium saucepan, add the sugar and 1 cup of water. Bring to a boil and let the sugar dissolve. Add the blueberries and bring back up to a boil, then lower to simmer for about 3-4 minutes.
  2. Strain the mixture with cheesecloth or a fine mesh strainer and let cool.
  3. Add 5 cups of water to a pitcher and add the lemon juice. Stir in the blueberry mixture and chill.
  4. Serve over ice with additional blueberries if desired.

June 3, 2015

Peach Cobbler


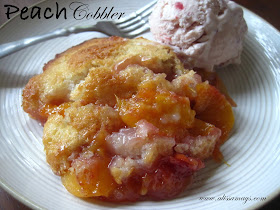
Being in the South, it's imperative to have these classics available.  Especially when the peaches here are some of the best you've ever tasted!  My daughter and I love to go peach picking at a local farm nearby.  Peach picking doesn't start here for about another month but the farm still had some available when we went there to pick blueberries.  I quickly brought them home and before we ate them all I knew I'd have to make this cobbler.  

Very simple to assemble, no fancy ingredients and even if you're not a baker, this one is easy. The finished result is wonderful.  Sweet crust with a tiny bit of chewiness around the edges.  The peaches are sweet, tender and juicy.  We topped this with some of the homemade ice cream I made recently and it was amazing. 

Peach season will be here soon!  Time to get ready!

Peach Cobbler
Recipe from Southern Living My Recipes


Ingredients
  • 1/2 cup unsalted butter, melted
  • 1 cup all-purpose flour
  • 2 cups granulated sugar, divided
  • 1 Tbsp baking powder
  • pinch of salt
  • 1 cup milk
  • 4 cups fresh peach slices
  • 1 Tbsp lemon juice
  • ground cinnamon or nutmeg (optional)
Cooking Directions
  1. Preheat the oven to 375º
  2. Melt the butter in a 9x13 inch baking dish or you can melt it in a small bowl and pour it in the dish.
  3. In a medium bowl combine the flour, 1 cup of sugar, the baking powder and salt. Add the milk and mix just until its all moist.
  4. Pour over the top of the butter. Set aside.
  5. In a saucepan, combine the peaches, lemon juice and the remaining 1 cup of sugar and cook until boiling, stirring constantly.
  6. Pour over in the prepared dish but DO NOT stir.
  7. Sprinkle with cinnamon or nutmeg if desired.
  8. Bake for 35 to 40 minutes.