Showing posts with label Quick Bread. Show all posts

April 4, 2017

Chocolate Banana Bread


You know, it seems like I always have overripe bananas.  Seriously, I guess I need to start buying 2 at a time.  However, on that same note, I wouldn't have found my new favorite banana bread recipe if I hadn't had these overripe bananas to use up.   

This bread is so stinkin good.  

My daughter is always my toughest critic in the house, and she loved it!  The bread was very moist, dense, and had a good dose of both banana and chocolate flavors.  Perfection!

My new favorite banana bread recipe!

Chocolate Banana Bread


Ingredients
  • 1 cup all-purpose flour
  • 1/2 cup unsweetened cocoa powder
  • 1 tsp baking soda
  • 1/2 tsp sea salt
  • 3 large (1 1/2 cups) bananas, mashed
  • 1/4 cup unsalted butter, melted and cooled slightly
  • 1/4 cup canola oil, vegetable oil, or melted coconut oil
  • 3/4 cup light brown sugar, packed
  • 1 large egg, room temperature
  • 1 tsp pure vanilla extract
  • 1 cup semi-sweet chocolate chips, divided
Cooking Directions
  1. Preheat your oven to 350º
  2. Spray a 9x5 inch loaf pan with cooking spray and set aside.
  3. In a medium bowl, combine the dry ingredients. Flour, cocoa powder, baking soda, salt.
  4. In the bowl of your stand mixer, add the slightly cooled melted butter, the oil and brown sugar. Mix until smooth.
  5. Add the slightly beaten egg and mix, then add the vanilla.
  6. Slowly add the dry ingredients and mix on low until smooth. Add in 3/4 cups of chocolate chips and mix briefly.
  7. Pour the batter into the prepared dish and sprinkle the remaining 1/4 cup of chocolate chips over the top.
  8. Bake for 60-65 minutes. Use a toothpick to determine if it's done.
  9. Let the bread cool in the pan for 15 minutes after removing from the oven. Then run a knife around the edges and remove from the pan, let cool on a wire rack and then slice.

August 16, 2016

Gluten Free Banana Chocolate Chip Bread


Every now and then my husband and I try a new diet, or a new way of eating just to see if we like it or if it makes any difference in our general health.  Currently my husband is trying out a Gluten Free lifestyle, and therefore, so are the rest of us. 

So far it's been pretty easy because I haven't baked anything in a while anyway and pasta's are easy enough to find in any grocery store.  It wasn't until I happened to notice the banana's on the counter looking a little dark that I decided to give a gluten free banana bread a try.  I already had all the ingredients so it was easy. 

If gluten free it new to you, your grocery store might have a section already dedicated to gluten free items which makes life so much easier. 

This recipe is easy to throw together.  The bread doesn't rise much to don't expect a big loaf here.  But the flavor is very good.  It's soft, full of banana and chocolate flavor and not overly dense.  I love that the sweetness from the banana's came through so no sugar is needed.  I have to be honest, that surprised me a bit.  Sometimes you try a no sugar recipe and you can definitely tell, but not on this one. Definitely a great gluten free recipe that I'll be making again. 

Gluten Free Banana Chocolate Chip Bread
Recipe from AmbitiousKitchen


Ingredients
  • 3 medium (1 1/4 cup) ripe banana's, mashed
  • 1 tsp vanilla extract
  • 1/4 cup almond butter
  • 2 whole eggs
  • 1/2 cup coconut flour
  • 1/2 tsp baking soda
  • 1/2 tsp baking powder
  • 1/2 tsp cinnamon
  • 1/4 tsp salt
  • 1/2 cup dark chocolate chips (diary free if needed)
Cooking Directions
  1. Preheat the oven to 350º
  2. Spray a loaf pan with non-stick spray, then line with parchment paper and spray again.
  3. In the bowl of your stand mixer, add the banana's, vanilla extract and almond butter and mix well.
  4. Add the remaining ingredients mix until combined.
  5. Pour into the prepared loaf pan and bake for 30-40 minutes or until a toothpick inserted into the middle, comes out clean.
  6. Remove from the oven and place on a cooling rack for 20 minutes before removing from the loaf pan.

June 3, 2016

Bakery Style Blueberry Muffins


I made this muffin recipe twice in quick succession.  Here's what happened:

Me: Honey I made these blueberry muffins for a friends family because her son just had surgery and is recovering.  Don't you think they'll like that?

Husband: Yeah, they'll love it.

30 minutes later....

Husband: Where are those muffins you made?

Me: I sent them over to the neighbors house....remember?

Husband: You didn't even save me one?

Me: No, I mean, you didn't say you wanted one when I told you I made them.

Husband: (glaring at me) you didn't save a blueberry muffin for the biggest blueberry lover in this house?

Me: Um, I was going to make another batch just for you....so you can have all of them...all to yourself.

Husband: Oh really? (smiling now) that's really great, thank you!

Me: (moving off toward the kitchen to make yet another batch of muffins) whew that was a close call.

So, I can vouch for them being a dependable muffin.  They turned out great both times and they tasted amazing.  Yes, he shared.  Great crumb, moist with plenty of blueberries.  The streusel topping is amazing and really takes these muffins into the "Bakery" type.  My husband loves them, my daughter loves them, I love them.

Even though there isn't any school here, we still enjoy a quick snack or breakfast.  We take them to the community pool with us, on drives or as an after workout energy boost.  Very convenient and very delicious.

Bakery Style Blueberry Muffins
Recipe from Little Sweet Baker


Ingredients
  • 2 1/2 cups all-purpose flour
  • 1 Tbsp baking powder
  • 1 tsp baking soda
  • 1/2 tsp salt
  • 1/2 cup unsalted butter, melted and cooled
  • 1 cup granulated sugar
  • 2 large eggs
  • 1 cup milk or buttermilk
  • 1 Tbsp vanilla extract
  • 1 1/2 cups blueberries, fresh or frozen
Streusel Topping
  • 1/4 cup granulated sugar
  • 1 Tbsp all-purpose flour
  • 2 tsp cold butter
  • 1/8 tsp ground cinnamon
Cooking Directions
  1. Preheat the oven to 425º and spray a 12 cup muffin pan or use cupcake papers.
  2. In a large bowl whisk together the flour, baking powder, baking soda and salt. Set aside.
  3. In another bowl, whisk together the melted butter and sugar. Add the eggs and whisk. Add the milk or buttermilk and vanilla and whisk again.
  4. Stir the wet ingredients into the dry and mix just until all the dry ingredients are moist.
  5. Fold in the blueberries.
  6. Distribute the batter evenly into the 12 muffin cups.
  7. Make the streusel
  8. Combine the sugar, flour, cold butter and cinnamon in a small bowl and use a fork to break up the butter until small pieces remain.
  9. Sprinkle the tops of the muffin cups with the streusel.
  10. Bake for 5 minutes at 425º and then leaving the muffins in the oven, turn the heat down to 375º and bake for 15 minutes or until a toothpick comes out clean.

May 6, 2016

Applesauce Honey Banana Bread


Sorry for the lousy picture...

This bread is pretty darn good, and I wanted to get it posted ASAP.  Now, before you run off all excited about a healthy version of banana bread, keep this in mind.  It's HEALTHY, so it's not going to taste like your favorite sour cream banana bread, or some of the other sugar laden banana breads you might be used to.  However, you can feel good about eating this one.

The banana flavor isn't extremely strong, but it's prominent enough that you know you're eating bananas. It's moist (sorry to those of you who hate that word), dense and wonderful.  After years of eating the other not-so-healthy varieties, I was surprised at what a nice change it was to eat something that wasn't super sweet.  I really enjoyed this bread, I even toasted it and smeared peanut butter over it for a change up (yummy).

I hope you'll give this one a try.  It's good to try new things and this one is even good for you.


Applesauce Honey Banana Bread
Recipe from Just A Pinch by Linda Bailey


Ingredients
  • 2 cups whole wheat flour (I used white wheat)
  • 1 tsp baking soda
  • 1/4 tsp salt
  • 1/2 cup unsweetened applesauce
  • 3/4 cup honey
  • 2 eggs, beaten
  • 3 overripe bananas, mashed
Cooking Directions
  1. Preheat oven to 350º
  2. Spray a 9x5 inch loaf pan with non-stick spray
  3. In a medium bowl, add the flour, baking soda and salt. Set aside.
  4. In the bowl of your stand mixer add the applesauce and honey, mix to combine.
  5. Add the beaten eggs and banana's and mix.
  6. Slowly add the dry ingredients until just combined.
  7. Pour the mixture into the prepared loaf pan and bake for 60-65 minutes.
  8. Test for doneness with a toothpick.

December 1, 2015

Proper English Scones


A couple of weekends ago I decided to put on an authentic English tea party for the kids in the neighborhood that play with my daughter.  There ended up being 5 girls between the ages of 6 and 9. I tried to make it as authentic as possible.  Luckily for me, one of my good friends used to live in England and was a tremendous help.

In my research for recipes I found a lot of scones but all of them were in the metric measurement that is used in Europe.  So needless to say, I was thrilled to find this one which has been converted to our measurement system here in the United States.

The scones turned out moist and delicious especially when topped with clotted cream (I bought at World Market) and jam. The picture above is how they do it in England and I absolutely loved it!  Clotted cream, if you're not familiar, is basically a thickened cream so it's not sweet or anything.  But the combination of the cream and the jam is to die for.

I haven't been to England yet so it's not for me to say how these scones rate with those, but I can tell you that they were delicious.

Proper English Scones
Recipe from Rock Recipes 


Ingredients
  • 1 2/3 cup all-purpose flour
  • 2 1/2 tsp baking powder
  • 3 Tbsp granulated sugar
  • pinch of table salt
  • 3 Tbsp unsalted butter
  • 1/2 cup milk
  • 1/2 tsp vanilla extract
  • 1 whole egg
Cooking Directions
  1. Preheat the oven to 400º
  2. In a food processor add the flour, baking powder and sugar.  Pulse to combine. (you can also just do this in a bowl).
  3. Pulse in the butter, use a pastry cutter or even just your fingers to break up the butter. You want the mixture to resemble coarse wet sand. 
  4. In a small bowl, whisk together the milk, egg and vanilla.  Reserve a couple of teaspoons of this mixture to brush on the scones before baking. 
  5. Add the dry ingredients in with the wet ingredients and mix together with a wooden spoon.  The dough should be sticky, be careful not to overtax the dough. 
  6. Put the dough on a lightly floured work surface, sprinkle a little bit of flour over the top and form into a round that is about 3/4 inch thick. 
  7. Use a 1 1/2 inch round biscuit cutter or whatever size you prefer to cut out the scones. 
  8. Place them on a cookie sheet lined with parchment paper or a silicone mat. Brush the tops with the reserved liquid mixture. 
  9. Bake for 12-15 minutes or until the tops are a light golden brown. 
  10. Let cool slightly before serving. 
  11. Serve with jam and clotted cream as shown above, or whatever your favorite topping is. 

October 27, 2015

Pumpkin Chocolate Chip Bread


This might be my one and only pumpkin recipe this year.  I love pumpkin breads and muffins but I'm not a pumpkin pie fan.  I think its a texture thing for me.

Anyway, in my constant quest to find things for quick breakfasts I stumbled up this recipe.  Thank you Pinterest!  I figured since it had chocolate chips in it there was a pretty good chance my daughter would eat it, and I was right!  Yay!

I love how moist the bread is and how it stays that way even days later.  I store mine in a sealable plastic bag in the refrigerator and it's still as delicious as it was on day one.  The chocolate chips are great for obvious reasons but they do offer a little change in the texture and appearance too.  I'm thrilled with this bread and will make it again for sure.

Pumpkin Chocolate Chip Bread


Ingredients
  • 1 3/4 cup all-purpose flour
  • 1 tsp baking soda
  • 2 tsp ground cinnamon
  • 1/4 tsp ground nutmeg
  • 1/4 tsp ground cloves
  • 3/4 tsp salt
  • 2 large eggs
  • 3/4 cup granulated sugar
  • 1/2 cup dark or light brown sugar
  • 1 1/2 cups pumpkin puree (canned or fresh)
  • 1/2 cup vegetable oil, canola oil or melted coconut oil
  • 1/4 cup orange juice
  • 2/3 cup semi-sweet chocolate chips
Cooking Directions
  1. Lower the oven racks to the lower 3rd of the oven to prevent over browning.
  2. Preheat the oven to 350º
  3. Spray a 9x5 inch loaf pan with non-stick spray, set aside
  4. In a large bowl add the first 6 ingredients and whisk together. 
  5. Mix the eggs and both sugars together in a medium bowl.  
  6. Add the pumpkin puree to the egg/sugar mixture.  
  7. Add the oil and orange juice to the wet mixture. 
  8. Combine the wet and dry mixes together, do not over mix. 
  9. Carefully add the chocolate chips. 
  10. Pour the batter in the prepared loaf pan and bake for 60-65 minutes - tent aluminum foil loosely over the bread about halfway through baking to prevent over browning. 
  11. Begin checking for doneness at 55 minutes by using a toothpick in the center. 
  12. Remove from the oven and let cool before removing the bread from the loaf pan. 

July 30, 2015

2-Ingredient Pizza Dough


Pizza isn't one of those things I can wrap my mind around ahead of time.  I think that's the reason frozen pizza's are so popular, they're a last minute thing.  Well, this recipe solves that problem.  If I can just remember to have plain Greek yogurt in my refrigerator I'll never need to buy frozen pizza again.

This recipe is easy to throw together (I mean come one, two ingredients?) just keep at it until it becomes a smooth dough.  I heated my pizza stone in the oven prior to even starting the dough.

The crust became nice and crispy on the bottom.  I found that one dough ball was the perfect size for my large pizza stone and it turned out like a pretty thin crust.  Obviously you can roll it out to your desired thickness.

As far as taste goes, it was quite good.  I think that some of the longer crusts (that need to rise) have a better taste but this one was totally delicious especially when you consider it only took 10 minutes to prepare and roll out and top.  I baked mine for about 15 minutes.  It also made me feel good to know I made it with my own two hands and there weren't any pesky preservatives added.  It's homemade, but really really fast.  Great recipe to have on hand for those times you don't "plan" on having pizza.

2-Ingredient Pizza Dough
Recipe from The Food Network


Ingredients
  • 1 3/4 cups self rising flour
  • 1 cup full fat or 2% Greek yogurt
Cooking Directions
  1. Mix both ingredients into a shaggy dough, then dump onto a lightly floured work area and knead into a smooth dough. 
  2. Roll into one large round pizza or two smaller ones.  Top and bake on a stone that has preheated in your oven set to 500º. 
  3. Can be refrigerated for up to two days.  Let come up to room temperature before rolling out. 

May 4, 2015

Mini Vanilla Scones


I craved these scones ever since I saw them on Pinterest.  The original recipe uses vanilla bean.  I didn't have that so I used vanilla extract.  Normally you would see beautiful little black specks throughout.  I will definitely make these again when I have some vanilla beans.

However, the flavor of these little scones are still just what I wanted.  Vanilla flavor topped with more vanilla flavor.  Can't beat it.

The scones themselves were moist yet firm.  The sweet glaze on top was just heaven.  I loved them.


Made with real vanilla beans above.

Mini Vanilla Scones
Recipe from Iowa Girl Eats


Ingredients
  • 2 cups all-purpose flour
  • 1/2 cup granulated sugar
  • 1 Tbsp baking powder
  • 1/4 tsp salt
  • 1/2 cup cold butter, cubed
  • 1/2 cup half and half (I used whole milk)
  • 1 whole egg
  • 2 tsp vanilla extract or 2 vanilla beans, scraped
Glaze
  • 3 cups confectioners' sugar
  • 6 Tbsp half and half (I used whole milk)
  • 1 bean or 1 tsp vanilla bean, scraped or extract
Cooking Directions
  1. Heat the oven to 425º
  2. Get a cookie sheet ready by using parchment paper or a silicone mat.  Set aside. 
  3. Use a food processor, bowl or stand mixer.  Add the flour, sugar, baking powder and salt and give it a quick mix/pulse to blend. 
  4. Add in the cold butter and pulse or blend to mix in until it looks like very small pieces of butter.  You can also use your hands to sort of squish the butter and then mix in. 
  5. Add the half and half, egg and vanilla to a separate bowl and mix, then add into the flour mixture. Pulse until it comes together as dough.  
  6. Place the dough onto a floured surface and knead 4-5 times.  Roll out into a rectangle about 1/2 inch thick. Cut into 6 rectangles and then cut each of those in half diagonally to make 2 triangles. 
  7. Place on the prepared cookie sheet and bake for 6-8 minutes or until the edges are just beginning to brown. 
  8. Remove to a cooling rack and prepare the glaze. 
  9. Whisk the glaze ingredients together until smooth.  Dip the cooled scones into the glaze and then transfer back to the wire cooling rack to let the glaze harden. 

January 2, 2015

Nutella Bread Star


I saw this amazing Nutella Bread Star on Facebook on New Years Eve and knew I waned to bring it to the party we were going to. After all, it only has three ingredients so how could I NOT?  I posted some pictures on Facebook and Instagram and it looks like many of you might want to give it a try.  

It looks amazing but it really quite simple.  Just give yourself about 20 minutes to assemble and then about 25-30 minutes to bake it.  

It's easy and it's a show stopper.  Oh and it also tastes amazing.  The video I have linked below suggests that if you're going to make your own dough that you make a Brioche dough.  I'll have to try that someday. 

The video is pretty short so I suggest watching it, but I've also tried to document the steps below. 


You're going to need 4 dough rounds, each cut to the size of a round dinner plate.  Top side down. 


Each layer needs a good smear of Nutella.  Leave about 1/2 and inch around the edges.  Heating the Nutella slightly will make it easier to spread. 


Once you've piled all the layers on top of each other, it's time to cut. First put a small glass in the middle.  This glass is a juice glass.  Now cut the dough into 4 even sections.  Then cut each section into 4 more even sized strips.  You should end up with 16 even sized strips. 


Pull two pieces up and twist them away from each other two times. This is what makes that star pattern.


Now pinch the ends of the sections you just rolled.  The pinched sections will be pinched vertically, not flat onto the cookie sheet.

Brush egg wash over the entire star and bake until golden brown.

The flavor is amazing, the sweet Nutella shines through.  If you're a Nutella lover this is a great recipe!

Nutella Bread Star
Recipe from DIY Cozy Home
The link above is a video that is very helpful


Ingredients
  • 3 packages pizza dough, I used Betty Crocker, made according to the directions on the back
  • 1 13 oz container Nutella (you won't use all of it)
  • 1 large egg and some water for the egg wash
Cooking Directions
  1. Heat the oven to 350º
  2. Make the dough according to the package instructions, form into a ball and cut into 4 even sized pieces.
  3. Flour your work surface and roll the dough out so it's pretty thin and big enough to fit a dinner plate on.  Cut around the dinner plate and throw the excess away or use it for something else. 
  4. Repeat for the other 3 pieces. 
  5. Lay the first layer out onto a cookie sheet that has been covered with parchment paper or a silicone baking mat. 
  6. Spread a layer of Nutella all around the dough circle leaving about 1/2 an inch around the edge. 
  7. Layer the other pieces of dough over the top, repeating the process until you get to the last dough round, do not put Nutella on the last dough round. 
  8. Put a small glass in the middle of the layered dough rounds.  Use a sharp knife to cut four even sections.  Cut each of those four sections in half and then each of those sections in half so you have 16 equal sized pieces.  (See the pictures above). 
  9. Take two cut dough ends and twist them twice away from each other.  So the one in the left hand should twist two times to the left, the one in the right hand should twist two times to the right. After you twist two pieces, pinch the bottom ends together. Do this to all the cut dough ends. 
  10. Use a brush to cover the top with egg wash and bake for 25 minutes or until golden brown. 
**If the directions above are confusing, click on the link above for DIY Cozy Home.  There is an excellent video you can watch.

November 5, 2014

Dinner Club: Theme - Fall Foods

Dinner club is back in session on our cozy little street.  I missed it.  There is just something wonderful about the people living on our street, more than anywhere else I've ever lived. We all spend time with each other eating, drinking and looking out for one another.  It's great.

I was a little hesitant about dinner club in October because it's such a busy month for everyone.  Soccer is in full swing and I think most of us on this street have kids who play, volleyball is going on as well.  Not to mention trying to get ready for Halloween and school in general.  Busy busy busy, I'm sure you all can relate even if you don't have kids.

I decided to take a chance and host the first dinner club since back in the spring.  Luckily the attendance, food and company were awesome!  We had a new member join use last night, hi Alison!  Glad you could make it!

I made two recipes for this dinner club feast.  The main dish was Texas Chili that was made in the slow cooker.


The second recipe I made was dessert, Chocolate Lasagna in fact. I've had this dessert many many times but I've never actually made it.  It's so easy and so delicious that I can see why it's such a favorite. 


Jambalaya is a great fall weather food.  Alison brought this delicious dish and everyone loved it.

Jambalaya

Ingredients and Directions

2 liquid to 1 rice ratio
Roux - 1 can tomato paste and oil 
add trinity and garlic
add sausage and chunky chicken
cool down a bit
add 1 can/box chicken stock/broth, 1 can hot water, 1-2 cans tomatoes whole/sauce, 1 can rotel
season with tony's
bring to boil
add uncle bens rice
bring to boil, cover and simmer until rices is done and no liquid remains (30-40 min) depending on how much is made

trinity-onion, bell pepper, celery


Everyone loved this cornbread casserole made by Lisa W. So full of flavor, I loved the texture and it appears to be easy to throw together for those busy weeknights. 


Cornbread Casserole
Recipe by Home Sweet Ruby


Ingredients
  • 1 can whole kernel corn, drained
  • 1 can cream style corn
  • 1 packages Jiffy corn muffin mix
  • 1 pint sour cream
  • 2 sticks butter, melted
  • 1/2 to 1 cup shredded cheddar cheese
Cooking Directions
  1. Preheat the oven to 350º
  2. Add all the ingredients (except the cheese) together in a medium bowl and stir.
  3. Pour into a greased 9x13 for thinner, 8x8 or 9x9 for thicker pan.
  4. Bake for 45 - 50 minutes.
  5. Add cheese to the top and bake for another 5 minutes.
  6. Let stand for 5 minutes before serving.

This little gem was made by Wendy. The original name for this recipe was "No-Bake Mini Pumpkin Cheesecakes" but we all thought that they were much more like a mousse than a cheesecake.  We loved the light an fluffy texture and the wonderful pumpkin cheesecake flavor.  Easy to make since there isn't any baking involved.  Great for the holiday's because your oven is probably already overloaded.  We all enjoyed this one tremendously. 


Pumpkin Mousse Cups
Recipe from A Family Feast 


Ingredients
  • 1 sleeve graham crackers
  • 1/2 stick (4 Tbsp) butter, melted
  • 2 Tbsp granulated sugar
  • 2 Tbsp brown sugar
  • 1 - 8oz package cream cheese
  • 1 - 15oz can pumpkin puree
  • 3 tsp pumpkin pie spice
  • 1 - 1oz package sugar free cheesecake flavored instant pudding
  • 1 - 14oz can sweetened condensed milk
  • 1-12oz container frozen whipped topping + extra for garnish
Cooking Directions
  1. Add the graham crackers to a food processor and process until they are fine crumbles. Add the melted butter and both sugars and process again until combined and it looks like wet sand.
  2. Press the graham cracker mixture into the bottom of several 9 ounce plastic cups. Refrigerate while you make the mousse. 
  3. In the bowl of your stand mixer with the paddle attachment and beat the cream cheese until smooth. 
  4. Add the pumpkin, pumpkin pie spice and pudding until well mixed. 
  5. Switch to a whisk attachment and add in the whipped topping, slowly, until combined. 
  6. Refrigerate for one hour. 
  7. Use a pastry bag or a zip lock bag with a tip cut off to add the filling into the cups on top of the graham cracker crust. 
  8. Refrigerate until ready to serve, top with more whipped topping and other garnishes if desired. 

Thank you Emily for bringing this one. I think I speak for everyone when I say that we all loved this soup.  Most of us love sweet potatoes anyway so this soup was a favorite.  Sweet potatoes are so good for you anyway so to find a new use for them is awesome. Full of creamy flavor with little bites from the cashews.  So good!


Cream of Sweet Potato Soup
Recipe from Food.com


Ingredients
  • 4 lbs sweet potatoes
  • 8 cups vegetable stock
  • 1/3 cup flour
  • 1/2 cup tomato sauce
  • 2 Tbsp half and half
  • 1 dash thyme
  • salt and pepper to taste
  • chopped cashews for garnish
Cooking Directions
  1. Preheat the oven to 375º
  2. Bake the sweet potatoes until tender, about 45 minutes. 
  3. Peel off the skins and mash them.  You don't need to get them completely smooth, some chunks are OK. 
  4. Add the mashed potatoes into a large stock pot and add the remaining ingredients except for the cashews. Bring to a boil and then simmer for 1 hour. 
  5. Add cashews when ready to serve. 
I believe we will resume our dinner clubs after the holiday's.  I can't wait!

October 28, 2014

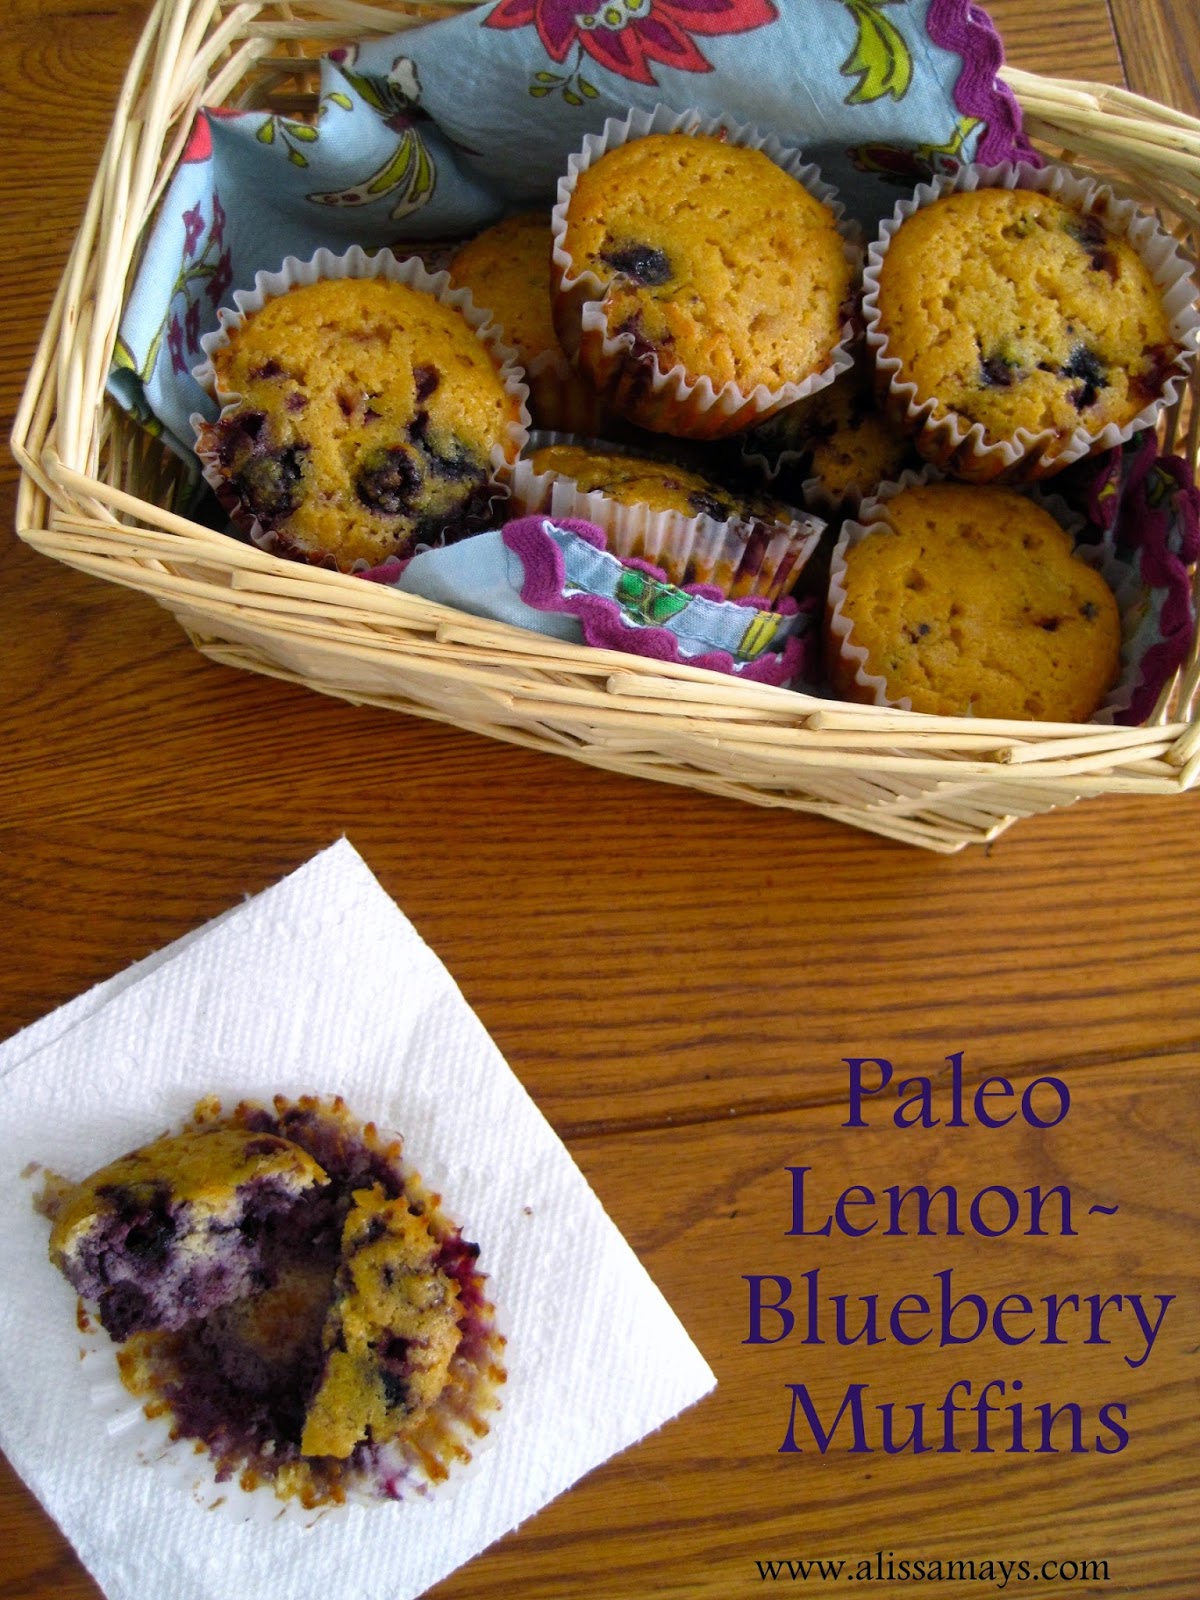
Paleo Lemon-Blueberry Muffins


As you may or may not know, I've been doing an eating plan called Whole30.  Whole30 is slightly different from Paleo, but it's close enough that you can use many of the same recipes. So, I happen to have a Paleo cookbook in my possession.  Lucky for me, because some mornings I just don't have time to cook an omelet or make some bacon.

Coconut flour is the key to this recipe.  If you're not having any luck finding any it's because it depends on your grocery store as to it's placement. I bought the Bob's Red Mill brand and I saw that some grocery stores had it in the flour section while others had a gluten free section and still others had a Bob's Red Mill section of some random isle. I'd just ask when you first walk in and save yourself some frustration.

There was some unapproved Whole30 ingredients in this recipe that I want to reveal to you now. You aren't supposed to have maple syrup or vanilla extract.  I've already done my 30 days and so I didn't feel that the minor cheats in this recipe would hurt that much.

This recipe is very different from a traditional lemon-blueberry muffin.  Good, but very different. We get so accustomed to the sweet flavors and the taste of all-purpose flour of regular muffins that sometimes it takes a while to get ourselves off those flavors.  The good news is that in my opinion this muffin had a nice sweet flavor, and the blueberries were perfect.  The lemon flavor was very mild and the texture is different but not in a bad way from a regular muffin. Not as fluffy but still moist.

Great alternative to the meat or eggs I have gotten used to with this eating plan.


Paleo Lemon-Blueberry Muffins
Recipe from Practical Paleo page 246


Ingredients
  • 6 whole eggs
  • 1/2 cup butter or coconut oil, melted
  • 1 tsp vanilla extract
  • 1/4 cup grade B maple syrup
  • 1 whole lemon, juiced and zest
  • 1/2 cup coconut flour
  • 1/2 tsp sea salt
  • 1/4 tsp baking soda
  • 1 cup fresh blueberries
Cooking Directions
  1. Preheat the oven to 350º
  2. In the bowl of your stand mixer with the whisk attachment, whisk the eggs, butter, coconut oil, vanilla extract, maple syrup, lemon juice and lemon peel.
  3. Sift in the coconut flour, sea salt and baking soda and stir until well combined.
  4. Fold in the blueberries.
  5. Line a muffin pan with muffin papers (natural parchment muffin papers work best) and use a 1/4 cup scoop to fill each muffin cup. Bake for 35-40 minutes.

October 6, 2014

Apple Praline Bread


One of my families favorite things to do is pick seasonal fruit.  Apples are particularly fun because we usually make a day trip out of going to the mountains to our favorite orchard.  This year we've been to two different orchards already.  I could seriously go every single weekend, I love it. 

This bread is full of apples and it's topped off with a sweet praline sauce that is to die for. I had to tear myself away from licking the pan.  My husband loved this bread and so did my friends when I brought it to our kickball game to share. Bread like this is not safe alone in the house with me.  Way to tempting. 


Easy to throw together without any unusual ingredients.  Very moist with chunks of apple.  The topping was my favorite.  I have a sugar addiction problem so this was right up my alley.


Apple Praline Bread
Recipe from Just A Pinch


Ingredients
  • 1 cup sour cream*
  • 1 cup brown sugar
  • 2 whole eggs
  • 2 tsp vanilla extract
  • 2 cups all-purpose flour
  • 2 tsp baking powder
  • 1/2 tsp baking soda
  • 1/2 tsp salt
  • 1 1/2 cups Granny Smith apples, peeled, cored and finely chopped
  • 1 cup nuts (walnuts, pecans or a combo)
Praline Sauce
  • 1/4 cup brown sugar
  • 1/4 cup butter
Cooking Directions
  1. Preheat the oven to 350º
  2. Grease a 9x5x3 inch loaf pan, set aside. 
  3. In the bowl of your stand mixer (or using a hand mixer) beat together the sour cream, sugar, eggs and vanilla on low speed until blended. 
  4. In a separate bowl add the flour, baking powder, baking soda and salt.  Whisk together. 
  5. Slowly combine the flour mixture in with the wet ingredients and beat on low until combined. 
  6. Use a spatula or spoon to add in the apples and half the nuts by hand. Incorporate well. 
  7. Pour the batter into the prepared loaf pan and press the remaining nuts into the top. 
  8. Bake for 60 minutes or until a toothpick inserted in the center comes out clean. 
  9. Cool in the loaf pan for about 30 minutes before removing from the pan and cooling the rest of the way on a wire rack. 
  10. For the praline sauce, add the brown sugar and butter into a small sauce pan and bring up to a boil. Lower the heat and simmer for about 1 minute, stirring constantly until it thickens.  Drizzle over the top of the cooled bread. 
* 1 cup sour cream substitution: 3/4 cup sour milk + 1/3 cup of butter, or 1 cup yogurt + 1 tsp baking soda, or 3/4 cup buttermilk + 1/3 cup butter. 

September 29, 2014

Buttermilk Chocolate Chip Crumb Muffins


Monday again? Didn't we just have a Monday? 

It's OK, I'm going to give you a recipe that allows you to have chocolate for breakfast.  

In my many faulted attempts to find something for my daughter to eat for breakfast, I stumbled on this recipe.  How could she NOT love it? 

The muffins are light and fluffy with a yummy chocolate bite, the confectioners' sugar topping really adds a nice sweetness.  This recipe made enough that I was able to share with some neighbors, and their kids loved them too.  Maybe not the healthiest breakfast in the world but still probably better then a lot of the pre-made things you can get in the grocery store.  All in all it was a great muffin!
Buttermilk Chocolate Chip Crumb Muffins
Recipe from Love and Olive Oil


Ingredients - Topping
  • 1/2 cup all-purpose flour
  • 1/2 cup brown sugar
  • 1/4 cup cold butter
  • 1 tsp vanilla extract
Ingredients - Muffins
  • 1 cup all-purpose flour
  • 1/4 cup cake flour
  • 1 tsp baking powder
  • 1/4 tsp baking soda
  • 1/4 tsp salt
  • 3/4 cup mini chocolate chips
  • 1/2 cup unsalted butter
  • 3/4 cup granulated sugar
  • 2 whole eggs
  • 1 tsp vanilla extract
  • 1/2 cup buttermilk
  • powdered sugar (for dusting)
Cooking Directions
  1. Preheat the oven to 400º
  2. Line 2 cupcake/muffin pans with 18 cupcake papers
  3. In a medium bowl, whisk together the flour's, baking powder, baking soda and salt.  Remove about 2 tsp of the flour mixture and put in a separate bowl and dump in 1/2 cup of the chocolate chips.  Mix together.  Set aside. 
  4. In the bowl of your stand mixer, add the butter and sugar and beat until light and fluffy on medium speed, about 2-3 minutes. 
  5. Add the eggs one at a time, mixing in between.  Add the vanilla extract and mix. 
  6. Incorporate the flour mixture and the buttermilk alternately.  Flour, buttermilk, flour, buttermilk, flour.  Fold in the mini chocolate chips that were stirred in with flour. 
  7. Place about 3 Tbsp of batter into each muffin cup.  Bake 12-15 minutes or until a toothpick comes out clean. 
  8. Top with the remaining chocolate chips while the muffins are still hot. 
  9. Let cool on a cooling rack, then dust with powdered sugar. 

July 25, 2014

Popover's


One thing I remember from my childhood is my mom's baking.  She used to make the best homemade pizza's and dinner rolls.  Isn't it funny how some foods from so long ago are still the one's you compare all others to?

Well, she baked these popover's for us while I was in Oregon and they were delicious!  She doesn't bake much anymore but you'd never know it.  Very yummy and more importantly, they had the size that popovers are supposed to have.  I've made them before in a cupcake tin and I just didn't get the height that these had.  I think I need to invest in a popover tin.

A perfect popover is golden brown on top, almost hollow inside.  When you rip open the muffin it should have the perfect spot inside for some butter and jam.  Serve them hot!


Popovers
Recipe from Betty Crocker


Ingredients
  • 2 whole eggs
  • 1 cup all-purpose flour
  • 1 cup milk
  • 1/2 tsp salt
Cooking Directions
  1. Preheat the oven to 450º
  2. Generously grease 6 popover cups, or you can use muffin cups. They will rise higher in a popover pan.
  3. Use a medium bowl to beat eggs slightly, add the remaining ingredients and just stir until smooth. Do not over mix.
  4. Bake for 20 minutes and then reduce the heat to 350º and bake for another 20 minutes or until deep golden brown.
  5. Remove from the tin immediately.

June 12, 2014

Quick Chocolate Croissants


OK, let me prepare you for a very complicated, in depth, time consuming recipe. 

Just kidding, this is the easiest recipe ever!

Two ingredients will make you ton's of friends.  Oh, and guess what? It doesn't HAVE to be chocolate.  Seriously, wrap a crescent roll around your favorite flavor and it's bound to be a hit.  How can it not be? Do you know how much butter is actually in a croissant? Well, a lot.  

Here are some variation ideas: 
  • Any flavor pie filling
  • Cream cheese mixed with anything, pretty much. Jalapeños, ranch dressing mix, your favorite veggies. 
  • Cheese
  • Hot dogs
  • I could go on and on here but I think you get the idea. 
Yeah, so basically you can wrap anything up and bake it and it'll be delicious but the nice thing about using dark chocolate is that it turns into a somewhat fancy dessert.  There is such a think as chocolate croissants that you can buy at some very fine bakeries and they are G.O.O.D. but they are also made from scratch and truly are gourmet.  This version you can whip up in like 15 minutes and they are mighty tasty. 

Canned dough, who knew right? 


Quick Chocolate Croissants
From Alissamays kitchen


Ingredients
  • 1 can refrigerated crescent roll dough
  • 1 cup dark chocolate chips
Cooking Directions
  1. Preheat the oven to 375º.
  2. Line a cookie sheet with parchment paper or a silicone mat.
  3. Break open the can of dough and pull apart the perforated shapes.
  4. Lay the dough flat, sprinkle with chocolate chips (not too many or they will ooze out, maybe about 1-2 Tbsp each.
  5. Loosely roll into the crescent shape and bake until golden brown. 11-15 minutes. 
  6. Serve at room temperature. 

June 6, 2014

Caramel Bacon Buns


Will you believe me if I told you I JUST made these? They're still warm actually.  I'm taking them to a party tonight and I'm pretty sure they're going to be loved by all.  I wasn't sure at first but once they started baking and my house started to smell like caramelized bacon I was pretty sure they'd be good.  I was right, they are.  Thank you Pinterest!

I've got to say, I'm not usually very fond of canned biscuits but when it comes to this appetizer, I really do think they are the best choice.

I'm not really sure if this falls under the appetizer or dessert category since it is covered in caramel sauce, but I think appetizer is perfect.  They are sweet but not over the top sweet.  The bacon gets sort of candy like on top the bun.  Just heavenly. I can't wait to share these tonight!

Caramel Bacon Buns
Recipe from Oh, Bite It!


Ingredients
  • 1 can refrigerated biscuits
  • 1 jar caramel sauce (for ice cream)
  • 1 package (about 8 pieces or so) bacon, cooked until crispy and chopped
Cooking Directions
  1. Preheat the oven to 400º
  2. Spoon a little caramel sauce into the bottom of 20 mini cupcake. I found a scant tsp was about right.
  3. Sprinkle as much bacon on top of the caramel as desired. About 1/2 a tsp.
  4. Cut each biscuit in half and lay one half on top of each caramel/bacon cup.
  5. Line a separate baking sheet with tin foil and place it on the rack under the rack you are going to cook these on, to catch any drips that might occur. 
  6. Bake for 10-15 minutes, until golden brown. 
  7. Get a cookie sheet ready so you can flip the buns over on top of it. 
  8. You can drizzle extra caramel sauce over the top if desired. 
  9. Makes 20 mini buns, serve at room temperature. 

May 16, 2014

Cinnamon Swirl Banana Bread


Oh thank goodness it's finally Friday.  Yea!  Do you have any big plans? 

Well, I do. Busy weekend ahead. 

My daughter just turned 6!  I know!  I can't believe it either.  Well, her party is scheduled for this weekend and I feel like I'm not prepared for it.  She threw me a curve ball when she said she didn't want cake or cupcakes for her party.  So, we're having an ice cream social instead.  Oh, did I forget to mention that she wants me to decorate sugar cookies? Do you want to guess how she wants me to decorate them? 

Nope, keep guessing. 

OK, I'll tell you.  Peacock….

What 6 year old chooses peacock for her theme I ask you!!

Well, I'll post some pictures but you all know that decorating is not my strong suit.  Wish me luck. 

Now on to today's recipe.  As usual I had banana's ripening on my counter, beyond the ripeness that you want to actually eat.  I didn't have some of the ingredients for my usual banana bread but I did have them all for this recipe.  I have to tell you.  I'm really thrilled with how it turned out.  Let's overlook the fact that I didn't exactly get the "swirl" in the middle of the bread.  It's more toward the upper 1/4 of the bread, oh well, it still tasted great. 

Its easy and you should have all these ingredients right in your pantry.  It's also nice that it just makes one loaf.  The cinnamon sugar gives the top a nice little crunch of sweetness.  Definitely a keeper. 

Cinnamon Swirl Banana Bread
Recipe from Maybe Matilda


Bread
  • 3 overripe banana's, mashed
  • 1/3 cup butter, melted
  • 1/2 cup granulated sugar
  • 1/4 cup brown sugar
  • 1 whole egg
  • 2 tsp vanilla extract
  • 1 tsp baking soda
  • dash of salt
  • 1 1/2 cups all-purpose flour
Swirl
  • 1/3 cup granulated sugar
  • 1 Tbsp ground cinnamon
Glaze
  • 1/2 cup confectioners' sugar
  • 2 Tbsp heavy cream
Cooking Directions
  1. Preheat the oven to 350º
  2. Spray a 9x5 inch loaf pan with non-stick spray
  3. In a large bowl, mix the banana's, butter, both sugars, egg and vanilla extract.
  4. In a separate bowl, combine the flour, baking soda and salt.
  5. Slowly add the dry mixture into the wet mixture, just until combined. Do not over mix.
  6. In a small bowl mix the swirl ingredients together.
  7. Pour half the batter into the prepared dish, sprinkle 2/3's of the swirl mixture evenly over the top, pour the remaining batter over that and then top with the rest of the swirl mixture.
  8. Bake for 50 minutes or until a toothpick comes out clean.
  9. When completely cool, combine the glaze ingredients and drizzle over the top.