Showing posts with label Gluten Free. Show all posts

March 23, 2017

Rainbow Fruit Salad


Summer is approaching and that means you'll need your fair share of snacks to cool you down.  This is one that you need to have in your refrigerator, for those hot days.  

Of course fruit is good by itself but if you leave it cut up in your refrigerator for too long, it begins to turn strange colors.  Especially those darn bananas.  This recipe is great because it isn't covering up that great fruit flavor, but adding a hint of extra flavor.  Coincidentally it's also helping to preserve that lovely color.  Lime juice is good like that. And you can't go wring with honey, I mean, really. 

This recipe is perfect for a quick snack on a hot day.  

Rainbow Fruit Salad
Recipe from Buzzfeed


Ingredients
  • 1 pound fresh strawberries, quartered
  • 4 kiwi's, peeled and diced
  • 2 mango's, peeled and diced
  • 2 bananas, peeled and diced
  • 12 ounces fresh blueberries
  • 2 Tbsp honey
  • 1 limed, juiced
Cooking Directions
  1. Combine the cut up fruit in a medium sized bowl. Mix together the honey and lime juice and pour over the fruit, stir. Serve at room temperature or chilled.

January 16, 2017

Banana and Chocolate Chip Oatmeal Muffins


I know I haven't posted much lately, and here's why.  It's the New Year and of course we're trying to eat better in my house.  My husband is gluten free and I'm just sort of doing my own thing but all of us are trying to eliminate sugar from out lives.  So, sadly I haven't had much that's interesting to cook.  I mean, you probably don't need to read about me making a grilled steak or chicken but slowly I'm finding more recipes that we can all eat. 

Like this one. 

Sweetened with maple syrup (love), gluten free, and my daughter's favorite flavor combination!  We're all happy with this one. My daughter ate two right out of the oven, which she never does.  She even knew they were good for her!  I think the banana chocolate chip flavor won her over.  I also let her make these, pretty much all by herself (not the oven part) and I think that helped also (she's super picky).


I loved that these muffins stay nice and moist, yet have a great texture from the oatmeal.  I used old fashioned oats and there is a nice chew with those.  Plenty of banana flavor and chocolate chips. My favorite part about these muffins is that they are the perfect amount of sweetness, and there's no sugar in them!  This will definitely become a favorite in my house, for everyone!

Banana and Chocolate Chip Oatmeal Muffins


Ingredients
  • 3 cups quick or old fashioned oats
  • 1/2 tsp ground cinnamon
  • 1/8 tsp ground nutmeg
  • 1 tsp baking powder
  • 1/4 tsp salt
  • 2 large eggs
  • 1/4 cup pure maple syrup
  • 1 cup (2 large) bananas, mashed
  • 2 tsp vanilla extract
  • 1 cup 1% milk
  • 1/4 cup coconut oil, melted
  • 1 cup mini chocolate chips
  • cooking spray
Cooking Directions
  1. Preheat the oven to 350º
  2. spray a muffin pan with non-stick spray, set aside .
  3. In a medium bowl add the oats, cinnamon, nutmeg, baking powder and salt and set aside.
  4. In another bowl, whisk together the eggs, bananas, vanilla extract, and milk until smooth.
  5. Add the oats into the wet ingredients and mix well, then add the coconut oil and chocolate chips and mix.
  6. Fill each muffin cup with an equal amount of batter and bake for 30 minutes. Let cool slightly before removing to a wire cooling rack.
  7. These can be frozen or refrigerated.

December 28, 2016

No-Bake Avalanche Cookies


So, this recipe was recently going around Facebook, and I thought, man those look good. And they're no bake, it was like they were begging me to make them. 

I'm really, really glad I did. 

These cookies are the bomb.  Easy to make and they stay delicious for a while after you make them too.  No stale cookies here, no sir, these taste just as good as they did the day they were made.  Oh, and I already had all the ingredients in the house, so Win! Win!


These Avalanche cookies have a soft texture, like fudge.  But they also have the wonderful texture of the Rice Krispies and the marshmallows. The peanut butter flavor is mild because it's mixed with white chocolate, but still noticeable.

Just an all around awesome cookie in my book, this one is going in "my favorites" section.  Yum!

No-Bake Avalanche Cookies


Ingredients
  • 16 oz vanilla flavored almond bark/CandiQuick
  • 15 oz creamy peanut butter
  • 2 cups Rice Krispies cereal
  • 1 1/2 cups mini-marshmallows
  • 1/2 cup + more for sprinkling mini chocolate chips
Cooking Directions
  1. In a large microwavable bowl, melt the almond bark in 30 second increments in your microwave until smooth.
  2. Add the peanut butter and stir until smooth.
  3. Add the Rice Krispies, marshmallows and chocolate chips and stir until evenly distributed.
  4. Line 2 cookie sheets with wax paper and then scoop a large amount (about the size of a small orange) of the mixture into a ball shape and place on the wax paper.
  5. Sprinkle more mini chocolate chips over the top if desired.
  6. Let sit in a cool area until hardened, you can also refrigerate until set.

December 14, 2016

Gluten Free Chocolate Cake


So, let me start off by apologizing for the lack of posts.  See, Thanksgiving happened and then soon after that I started to get word that my gramma wasn't doing well.  Well, I'm in South Carolina and she's in Montana so I was sort of playing it by ear.  When the call came that it had gotten more serious, me and my daughter jumped on a plane and flew to Montana.  My gramma passed away at the age of 96, so it was expected but still difficult.  So, that's why there hasn't been any posts from me lately.  But I'm back and ready to hit the kitchen again!

This recipe was made before I left.  My husband, as you may or may not know, is on a gluten free diet as it greatly helps with his asthma.  

This cake had great chocolatey flavor.  It's more dense than your average flour cake but I didn't mind it and neither did my husband and daughter.  It didn't last long in this house! Because, when you're craving chocolate cake you just gotta have it!


I just used a store bought gluten free frosting but homemade would be delicious too.  I'm glad I tried this recipe and now have one more for my gluten free recipe box!


Gluten Free Chocolate Cake
Recipe from Hershey


Ingredients
  • 2 cups granulated sugar
  • 1 3/4 cup gluten free flour mix
  • 3/4 cup cocoa powder
  • 1 tsp salt
  • 1/4 tsp baking soda
  • 1/4 tsp baking powder
  • 2 large eggs
  • 1 cup milk
  • 1/2 cup vegetable oil
  • 2 tsp vanilla extract
  • 1 cup boiling water
Cooking Directions
  1. Preheat the oven to 350º
  2. Spray 2 9-inch cake pans with non-stick spray and then dust with cocoa powder.
  3. Mix all of the dry ingredients together in a large bowl and whisk together. Add the eggs and milk and stir, then add the remaining ingredients and mix until smooth and lump free.
  4. Pour into the prepared cake pans. Place in the oven and bake for 35-60 minutes, or until a toothpick inserted in the middle comes out clean.
  5. Remove from the oven and let cool on a cooling rack. After about 5 minutes you can run a knife along the edges and then remove so a cooling rack to cool completely before frosting.

November 23, 2016

Crustless Cheesecake with Cranberry Sauce


Happy Thanksgiving everyone!  Okay, a day early.  Well, my family actually had our Thanksgiving yesterday because my husband had to run off to work today, we it's over for us. But, it worked out perfectly because now I can get you this recipe just in time!

So, my husband is Gluten Free so this recipe caught my eye right away, then I saw the addition of cranberry flavors and I knew this was it.  I was a little hesitant because if there's no crust, how does the cheesecake keep it's shape? Well, it worked perfectly.  It holds it's shape without being hard at all.  In fact, it's so smooth and buttery I can hardly stop eating the leftovers. 

There are only a few ingredients and it comes together so nicely.  If you've got room on your table for one more dessert, this has got to be it. 


Crustless Cheesecake with Cranberry Sauce
Recipe from BHG


Ingredients
  • 4 (8 oz) cream cheese, softened
  • 1 cup granulated sugar
  • 3 large eggs
  • 1 tsp vanilla extract
  • cranberry sauce (optional)
  • sugared cranberries (optional)
Cooking Directions
  1. Preheat the oven to 275º
  2. Spray an 8 inch springform pan with non-stick spray and wrap the bottom with aluminum foil.
  3. In the bowl of your stand mixer, add the cream cheese and sugar and mix on medium high for about 8-10 minutes or until the sugar has dissolved.
  4. Add the eggs and vanilla extract and mix until combined.
  5. Pour the mixture into the prepared pan and place into a shallow roasting pan. Put the roasting pan on the oven rack and add boiling water to the roasting pan until it's about halfway up the side of the springform pan. Bake for 70-75 minutes.
  6. The cheesecake is done when the center is almost set. If you bump the side of the springform pan you should just barely see a jiggle in the center.
  7. Remove from the oven and take out of the water, remove the aluminum foil and let the cake sit for about 10 minutes.
  8. Run a sharp knife along the edges of the pan and then unbuckle the spring form pan and carefully remove it from the cheesecake. Let the cake cool completely on a cooling rack.
  9. If you're using the cranberry topping: Pour the canned, jellied cranberry sauce into a blender and liquefy it. Pour it over the top of the cheesecake and decorate with sugared cranberries.
  10. Refrigerate leftovers.

November 14, 2016

Muffin Cup Omelets


You know, we're all a little short on time in the mornings.  Be it because we hit the snooze button one too many times (you know who you are), or the baby's up all night, or the kids bus arrives before the butt crack of dawn....whatever the reason, we could all use a little help. 

Muffin cup omelet's aren't something I invented, in fact they're all over the Internet so you can get a bunch of ideas from there if you want.  But this one is one my family enjoys, (Next time I'm throwing in black olives). 


These are easy to throw together and they will last all week in the refrigerator.  Just keep in an air tight container. Microwave for about 30 seconds when ready to eat and ta da! Breakfast is served!

Your options are endless, customize them your own way. You really can't go wrong.

Muffin Cup Omelets
From Alissamay's kitchen


Ingredients
  • 12 large eggs
  • 1 pound breakfast sausage (I used Neese)
  • 1 small onion, diced
  • 1 cup shredded cheese (I used colby jack)
  • baby spinach leaves
  • You can omit and add the ingredients of your choice. 
Cooking Directions
  1. Preheat oven to 350 and grease a 12 cup muffin tin with non-stick spray.
  2. In a frying pan, cook the sausage and onion until done, drain oil and set aside.
  3. To the bottom of each muffin cup, add about 3-4 leaves of spinach and press them down to the bottom. Add a spoonful of sausage/onion into each cup and then go back and keep filling the cups evenly with the remaining sausage/onion until it's all been used.
  4. Top the sausage with more veggies of your choice if desired.
  5. In a large bowl, whisk together the eggs and add a little milk and whisk. Add salt and pepper.
  6. Pour the eggs into each cup until it gets to the top of each cup. Sprinkle with cheese and bake for 25-30 minutes or until the cheese has melted and the egg becomes puffy.
  7. Remove and let sit in the muffin tin for about 5 minutes.
  8. Top with salsa and sour cream, or whatever you desire.

November 8, 2016

Flourless Monster Cookies


I'm sorry for not posting last week, I was on vacation in Massachusetts.  Visiting my husbands family, doing Halloween there, doing the Freedom Trail and visiting New Hampshire.  We were busy, busy, busy.  No tine to post anything, sadly. 

I hope these awesome cookies make up for it just a little. 

I'm still on my flourless obsession.  These cookies are so good you'll never know there isn't any flour in them.  There is oatmeal and that gives them plenty of texture. The peanut butter flavor is not overwhelming.  Just subtle.  The big pieces of chocolate makes me extremely happy.  These cookies turn out golden on the bottom, chewy and flavorful.  I love them. 

Join me on my flourless recipe quest.  If you've got any good one's, send them my way!

Flourless Monster Cookies


Ingredients
  • 3 whole eggs
  • 1 1/2 cups brown sugar
  • 1 cup sugar
  • 2 tsp vanilla extract
  • 2 tsp baking soda
  • 1/2 cup butter, room temperature
  • 1 1/2 cups peanut butter, regular or crunchy
  • 4 1/2 cups oats, quick or old fashioned
  • 1 cup semi-sweet chocolate chips
  • 1 cup M&M's
Cooking Directions
  1. Preheat oven to 350º
  2. Mix together all of the ingredients (except the chocolate chips and M&Ms) in a large bowl or strand mixer and mix until combined.
  3. Add the chocolate chips and M&M's and mix well by hand.
  4. Scoop about 2 inch round balls of dough and place on a cookie sheet, then use your hand or the bottom of a glass to smoosh down slightly.
  5. Bake for about 10-12 minutes. Leave on the cookie sheet for about 5 minutes before removing to a cooling rack.
  6. Store in an airtight container.

October 26, 2016

Gluten Free Carrot Cake


I'm completely in love with this recipe.  It's seriously delish.  You can't even tell it's gluten free I swear to you.

Moist (sorry for those of you who hate that word), delicious cinnamon notes and the cream cheese frosting is just yum.  I think I need to make another one ASAP.

After my husband went gluten free I was thinking I'd miss out on all those yummy carbs, but you can still eat yummy carbs this way too.  No loss of flavor here.  Easy to throw together and yummy.  You can't beat it.


Gluten Free Carrot Cake
Recipe from About Food


Ingredients
  • 2 cups granulated sugar
  • 4 whole eggs
  • 1 1/2 cups light olive oil or vegetable oil
  • 2 tsp vanilla extract
  • 2 cups all-purpose gluten free flour mix
  • 2 tsp baking soda
  • 2 tsp baking powder
  • 2 tsp cinnamon
  • 1 tsp salt
  • 1 cup chopped nuts or raisins (optional)
  • 3 cups freshly grated carrots
Frosting: 
  • 4 Tbsp unsalted butter, softened
  • 3 ounces cream cheese, softened
  • 1 tsp vanilla extract
  • 2 1/2 cups gluten free powdered sugar
Cooking Directions
  1. Preheat the oven to 350º
  2. You will need either 2-9" round cake pans, 1-9x13 inch dish or 36 muffin cups. Spray with non-stick cooking spray. If using cake pans, line the bottoms of each with parchment paper and then spray with non-stick spray. Set aside.
  3. Add the sugar and eggs to a stand mixer and blend until smooth, then add the oil and vanilla extract. Mix until smooth. 
  4. In a separate bowl add the dry ingredients: Flour, baking soda, baking powder, cinnamon and salt. Slowly add this to the wet mixture and mix just until smooth. 
  5. Stir in the carrots and raisins or nuts or neither. 
  6. Pour into the prepared pan and bake. Bake for 45-55 minutes for all pans other than the muffins.  For the muffins bake for 30-35 minutes. Insert a toothpick in the middle to check for doneness. 
  7. Let cool on a rack before frosring. 
  8. To make the frosting, combine all the ingredients together and mix until smooth. 

October 19, 2016

Quick Gluten Free Lasagna


A chill in the air means I break out the comfort food and lasagna is one of our favorites.  My daughter only recently started liking lasagna, and after 8 years of not eating it she requests it often.  I'm only too happy to oblige of course.  I mean, how could I say no? This recipe is very simple to throw together on a busy week night and tastes amazing.

Everything is already cooked when you throw the layers together so it's just a matter of melting the cheese.  Gluten free is such a big deal right now that it's not problem at all finding Rotini noodles. And most pasta sauce is gluten free but just check the label to make sure.

I have used both sliced mozzarella and shredded for this recipe but the slices to tend to be a bit stringier (which I like) so that's what I use mostly. Feel free to substitute your favorite meat sauce for the jarred sauce and meat, since you're making this you can add whatever your family likes best.  I love this recipe and my family does too.

Quick Gluten Free Lasagna
Recipe from FlippenDelicious


Ingredients
  • 1 pound gluten free rotini
  • 1 pound hamburger
  • 1 (32 oz) jar pasta sauce (gluten free)
  • 1 (24 oz) container cottage cheese
  • 1/2 cup grated Parmesan cheese
  • 1 1/2 tsp Italian seasoning
  • 2 1/2 cups shredded mozzarella cheese
Cooking Directions
  1. Preheat the oven to 375º
  2. Follow the package instructions to cook the pasta. Set aside.
  3. Brown the ground beef, drain off the excess fat.
  4. In a bowl, combine the cottage cheese, Parmesan cheese and Italian seasoning.
  5. Pour just enough pasta sauce on the bottom of a 9x13 inch dish to cover the bottom.
  6. Pour the cooked pasta on top of that, followed by the cooked hamburger.
  7. Top all that with the remaining pasta sauce.
  8. Spoon the cheese mixture over the top of all that and spread around evenly and then sprinkle with mozzarella cheese.
  9. Bake for 20 minutes or until the cheese is melted.

October 13, 2016

3-Ingredient Brownies


So, in my flourless dessert obsession continues.  I just can't help it!  Ok, so this recipe intrigued me because it's "healthy".  Well, in fact, it really is healthy.  I was leery, but still opted to give them a chance. 

My conclusion? 

They are surprisingly good.  I didn't add mashed banana which is one option to give them a sweeter flavor, and I used mashed sweet potato and not pumpkin so they weren't very sweet.  The frosting obviously kicks up the sweet factor and I'm anxious to try it with the banana just to see how sweet they can get and still be healthy.  

The texture is very dense and heavy.  The flavor is chocolatey, smooth texture and the sweetness comes from the frosting.  Very good.  I even shared some with my neighbor and she loved them.  It's kind of hard to believe they only have three ingredients and are actually healthy. 


3-Ingredient Brownies
Recipe from The Big Mans World


Ingredients
  • 1 cup pumpkin puree or mashed sweet potato
  • 1/2 cup drippy almond butter or any nut butter
  • 1/4 - 2/3 cup cocoa powder
Cooking Directions
  1. Preheat the oven to 350º
  2. Coat a small 4x6 or 6x6 inch loaf pan with non-stick cooking spray, set aside.
  3. Place all the ingredients in a high powered blender or food processor or in a bowl and blend until fully incorporated.
  4. Pour into the prepared loaf pan and bake for 15 minutes and then begin checking for doneness. Mine took more like 30 minutes to get done. Test with a toothpick inserted in the middle, when it comes out clean they're ready.
  5. **1/2 cup mashed banana's in place of 1/2 cup pumpkin or sweet potato will make a sweeter brownie.
  6. Frost with whatever frosting you like best. 

October 3, 2016

Mongolian Beef


Mongolian beef is a fast, easy item to make for dinner.  It takes no time at all and yet tastes like you spent all night making it.  

The beef is cut in pretty thin slices so it's easy to chew and has great flavor.  The sauce is yummy yet not overly strong. The onions add a nice crunch and a bit of color.  I served mine over rice to keep it gluten free but it would also be delicious over egg noodles.

Perfect dinner for a busy week night.  


Mongolian Beef
Recipe from My Recipes


Ingredients
  • 2 Tbsp low sodium soy sauce
  • 1 tsp granulated sugar
  • 1 tsp cornstarch
  • 2 tsp dry sherry
  • 2 tsp hoisin sauce
  • 1 tsp rice vinegar
  • 1 tsp chili paste with garlic
  • 1/4 tsp salt
  • 2 tsp peanut oil
  • 1 Tbsp minced fresh peeled ginger
  • 1 Tbsp fresh garlic, minced
  • 1 pound sirloin steak, cut against the grain
  • 16 medium green onions, cut into 2 inch pieces
Cooking Directions
  1. Combine the first 5 ingredients and whisk until smooth.
  2. Over medium high heat, heat the peanut oil in a large skillet or wok.
  3. Add the ginger, garlic and meat. Cook for 2 minutes.
  4. Add the green onion pieces and cook for 30 seconds.
  5. Add the soy sauce mixture and cook for 1 minute or until thick. Serve hot.

September 21, 2016

Fudgy Flourless Chocolate Brownies


Continuing my flourless obsession, meet the flourless brownie.  I'd like to just add that I had to make two pans of these back to back because the first pan of them disappeared so fast I couldn't photograph them.  With the second pan, I had to threaten lives not to touch them before I could take a picture. That worked but they didn't last long after that.

So, flourless desserts are yummy, easy to make, and gluten free.  I'd eat these even if they weren't gluten free.  The outside is very much like a normal flour type brownie but the middle is much softer. Sort of like eating a cookie straight out of the oven (but without all that pain).

This, being the third flourless recipe I've tried is not going to be the last.  I just love them.  Don't get me wrong, they aren't any healthier for you.  There is still sugar and butter in them.  But, sugar and butter mixed with chocolate equals deliciousness. :)

Flourless Fudgy Chocolate Brownies
Recipe from Life Made Simple


Ingredients
  • 6 Tbsp unsalted butter
  • 3/4 cup granulated sugar
  • 8 oz semi-sweet chocolate
  • 2 whole eggs at room temperature
  • 1 tsp vanilla extract
  • 1 Tbsp unsweetened cocoa powder
  • 3 Tbsp cornstarch
  • 1/4 tsp salt
Cooking Directions
  1. Preheat the oven to 350º
  2. Line a 8x8 or 9x9 inch square pan with tin foil and then spray with non-stick spray. Set aside.
  3. In a medium saucepan, over low heat melt the butter and then add the sugar. After the sugar is incorporated add the chopped chocolate. Stir until melted and smooth and then remove from the heat and beat with a hand mixer for 2 minutes.
  4. Add the eggs one at a time and then add the vanilla extract.
  5. Whisk until smooth.
  6. Use a mesh sieve to add the cocoa powder and cornstarch into the mixture. Then add the salt. Use a hand mixer to beat for another 2 minutes.
  7. Pour the batter into the prepared pan and bake for 22-30 minutes. Insert a toothpick into the middle to check for doneness. Do not overtake.
  8. Remove from the oven and let cool in the pan for at least 45 minutes before cutting.
  9. Use the tin foil to lift out of the pan and cut.

September 12, 2016

Flourless Chocolate Cake


You're looking at the reason my diet isn't going well.   My husband had a hankering for a piece of chocolate cake, so I indulged him and made this.  The great thing is that it's gluten free because it's completely flourless.  The bad thing is that it tastes amazing.  Like, thank goodness it's pretty rich or I would have eaten the whole thing myself, amazing. 

Don't confuse Gluten Free with healthy.  Just because there isn't any flour doesn't make this health food. 


It's obviously a different texture than cake.  But, because you're not substituting other flours for the wheat flour you already sort of have the expectation of a texture difference.  Instead, it's creamy all over.  It's smooth, chocolaty, and rich.  It's sort of like eating a big chocolate chip. 

Then, you add the chocolate ganashe on top (which I topped with mini chocolate chips) and it takes you into a chocolate induced coma. 


My family LOVED this cake.  In fact, I sent a piece over to my neighbor, so she made it, and her family loved it too. I'm loving all the flourless recipes I've found on Pinterest.
Grab a big glass of your favorite milk and a little piece of this heaven on a plate and enjoy!

Flourless Chocolate Cake
Recipe from Melanie Cooks


Ingredients
  • 1 cup semi-sweet chocolate chips
  • 1/2 cup (1 stick) unsalted butter
  • 3/4 cup granulated sugar
  • 3 whole eggs
  • 1/4 cup unsweetened cocoa powder
  • 2 tsp espresso powder (optional)
Chocolate Ganache
  • 1 cup semi-sweet chocolate chips
  • 1/2 cup heavy cream
Cooking Directions
  1. Preheat the oven to 375º
  2. Use a 9 inch round cake pan. Spray with non-stick spray, then line with a piece of parchment paper that has been cut to fit the bottom of the cake pan. Then spray the top of the parchment paper.
  3. Put the butter and the chocolate chips in a microwave safe bowl and heat for 1 minute, stir and keep heating in 30 second increments until smooth. This can also be done over low heat in a saucepan.
  4. Pour the chocolate mixture into a mixing bowl and add the sugar, eggs, cocoa powder and espresso powder if using. Whisk until smooth.
  5. Pour the batter into the prepared cake pan and bake for 20 minutes.
  6. Remove from the oven and let cool for 10 minutes.
  7. Run a knife around the edges of the pan to loosen, then put a plate on the top of the cake pan and flip the cake over quickly.
  8. Peel off and discard the parchment paper.
  9. Now make the ganache. Heat the chocolate chips and heavy cream in a small saucepan over medium heat, whisking until smooth.
  10. Pour over the still warm cake and use a knife to cover it completely.
  11. Refrigerate the cake for at least an hour before cutting.

September 6, 2016

Flourless Peanut Butter Chocolate-Chip Cookies


I'm totally digging flourless recipes.  I can't tell you how much easier they are to make, and they taste amazing, and they are gluten free. I've recently jumped on the Gluten Free bandwagon (not 100%, but I'm about 95% there) and I'm loving how much less bloated I feel.  The only hard part for me has been the comparisons to standard bread products and gluten free since they are different flour flavors and textures. I just need to get used to it.  That's why I'm loving the flourless recipes.  There isn't anything to "get used to" because the flavor of whatever you're baking are just more intense.

For example, this peanut butter chocolate chip cookie has great peanut butter flavor.  You don't get the chewy cookie that you might with a regular flour recipe but they're still moist with a tiny bit of chewiness around the edge.  I love them.

This is the second recipe I've made that was flourless.  I'll post the first one I made soon but I have loved them both so much.  Don't get me wrong, just because they don't have any flour doesn't make them healthy.  But if you're gluten free, sometimes you just want a great tasting treat.

I'd eat these flourless desserts even if I wasn't trying to avoid gluten, they are that good.


Flourless Peanut Butter Chocolate-Chip Cookies
Recipe from Southern Living


Ingredients
  • 1 cup creamy peanut butter
  • 3/4 cup granulated sugar
  • 1 large egg
  • 1/2 tsp baking soda
  • 1/2 tsp salt
  • 1 cup semi-sweet chocolate chips
Cooking Directions
  1. Preheat the oven to 350º
  2. Mix the peanut butter and sugar together in a mixing bowl until smooth. Add the remaining ingredients and stir until smooth.
  3. Use a cookie scoop or two spoons to dollop dough onto the cookie sheet about 2" apart.
  4. Bake for 12-14 minutes. Let cool for 5 minutes before moving to a cooling rack.

August 23, 2016

Gluten Free Apple Cranberry Pie


Recently, my husband and I decided to try a Gluten Free diet.  Purely for experimental purposes.  Turns out, my husband has had amazing results.  He hasn't had any of the Asthma problems he usually has on a daily basis.  No inhaler needed for weeks. I haven't been on it as long so I haven't noticed anything yet but we'll see.

Anyways, we've gotten a couple of cookbooks to help us out and we've tried a couple of great recipes lately. Some of you might be wondering what Gluten is exactly.  Well here you go:
  1. a substance present in cereal grains, especially wheat, that is responsible for the elastic texture of dough. A mixture of two proteins, it causes illness in people with celiac disease.

So, Gluten can also just be a sensitivity in some people which apparently it is in my husband and switching to non-gluten items is pretty easy. It's such a common problem now that there are Gluten Free items available everywhere. There might even be a "Gluten Free" section of your grocery store.

I did have to run out and get some new items to bake this pie but they are items I'll use over and over in the future.

The Pie was wonderful.  The flavor was just what you'd expect with the added benefit of those chewy cranberries.  The crust was a little difficult to work with.  It crumbled easier then a normal crust so I needed up adding a little water and making sure it was really cold before trying to work with it. Make sure your rolling pin is well gluten-free floured up. After moving most of it to the pie plate I ended up just pressing pieces into the dish to make a complete pie crust.  It worked well in the end, just be aware that it's much more crumbly. The flavor is great however, similar to a regular pie crust but the texture is more on the crumbly side as I just mentioned. I used Gala apples but you can use whatever apples you want, just adjust the sugar based on how sweet the apple is.

Gluten Free Apple Cranberry Pie


Ingredients

Filling
  • 6 medium apples - peeled, cored and sliced
  • 3/4 to 1 cup granulated sugar
  • 1/2 cup dried cranberries
  • 2 Tbsp cornstarch
  • 2 tsp lemon juice
  • 1 Tbsp ground cinnamon
Crust
  • 2 cups Gluten Free all-purpose flour
  • 1/4 cup sweet rice flour
  • 1 Tbsp granulated sugar
  • 1 tsp xanthan gum
  • 1/2 tsp salt
  • 3/4 cup cold butter
  • 2 whole eggs
  • 1 1/2 Tbsp cider vinegar
Cooking Directions
  1. Make the dough first, so there's time to chill it. Add the first 6 ingredients to a bowl and use a pastry cutter to blend it until only small pieces of butter remain.
  2. Make a whole in the center and add the eggs and vinegar, mix together just until incorporated.
  3. Cut into two equal pieces and wrap in plastic wrap and refrigerate for 45 minutes.
  4. When the dough is chilled, start preheating the oven to 425º
  5. In a large bowl mix the filling ingredients and stir together so it's all coated.
  6. Roll out one of the crusts on a lightly floured surface and roll out to 1/4 thick and place in the pie dish. I found it easier to just press the dough into the dish since the dough can be crumbly.
  7. Add the apple filling on top of the dough and then top with the other piece of dough that has been rolled out.
  8. Cut the dough to allow for ventilation.
  9. Bake at 425º for 12 minutes and then reduce the heat to 350º and bake for 30-40 minutes. Check the apples to make sure they have softened.

August 16, 2016

Gluten Free Banana Chocolate Chip Bread


Every now and then my husband and I try a new diet, or a new way of eating just to see if we like it or if it makes any difference in our general health.  Currently my husband is trying out a Gluten Free lifestyle, and therefore, so are the rest of us. 

So far it's been pretty easy because I haven't baked anything in a while anyway and pasta's are easy enough to find in any grocery store.  It wasn't until I happened to notice the banana's on the counter looking a little dark that I decided to give a gluten free banana bread a try.  I already had all the ingredients so it was easy. 

If gluten free it new to you, your grocery store might have a section already dedicated to gluten free items which makes life so much easier. 

This recipe is easy to throw together.  The bread doesn't rise much to don't expect a big loaf here.  But the flavor is very good.  It's soft, full of banana and chocolate flavor and not overly dense.  I love that the sweetness from the banana's came through so no sugar is needed.  I have to be honest, that surprised me a bit.  Sometimes you try a no sugar recipe and you can definitely tell, but not on this one. Definitely a great gluten free recipe that I'll be making again. 

Gluten Free Banana Chocolate Chip Bread
Recipe from AmbitiousKitchen


Ingredients
  • 3 medium (1 1/4 cup) ripe banana's, mashed
  • 1 tsp vanilla extract
  • 1/4 cup almond butter
  • 2 whole eggs
  • 1/2 cup coconut flour
  • 1/2 tsp baking soda
  • 1/2 tsp baking powder
  • 1/2 tsp cinnamon
  • 1/4 tsp salt
  • 1/2 cup dark chocolate chips (diary free if needed)
Cooking Directions
  1. Preheat the oven to 350º
  2. Spray a loaf pan with non-stick spray, then line with parchment paper and spray again.
  3. In the bowl of your stand mixer, add the banana's, vanilla extract and almond butter and mix well.
  4. Add the remaining ingredients mix until combined.
  5. Pour into the prepared loaf pan and bake for 30-40 minutes or until a toothpick inserted into the middle, comes out clean.
  6. Remove from the oven and place on a cooling rack for 20 minutes before removing from the loaf pan.

August 3, 2016

Creamy Crock-Pot Chicken Tikka Masala


At times during my life I've been one of those well organized people who plans dinner, makes the grocery list and only buys what I need. 

I'm not that person right now. 

We basically decide what we're having for dinner while we're eating lunch. Don't be like me. 

Luckily, this recipe was pretty easy to throw together into a slow cooker and have ready in 4 hours. My husband chose this recipe from Pinterest.  Since he rarely gets to be the one to choose the recipe I'm gonna make I jumped on this one.  Finally something new and good for you!

We both loved this recipe.  Ton's of flavor, most of the ingredients are in your pantry right now.  I did have to run out for a couple of items but overall I had most of it. I started cooking the rice (in the microwave) at the same time you begin to add the last couple of ingredients and it all came together at the same time.  

Obviously you don't have to serve with rice, it'll just depend on you personal tastes but I thought it was fantastic with rice. 

Creamy, tender chicken and the last minute addition of the lemon juice was perfect.  I didn't need salt at all, the lemon juice was perfect. 

If you're feeling adventurous tonight, you should give this recipe a try. Delicious! 

Creamy Crock-Pot Chicken Tikka Masala
Recipe from The Iron You


Ingredients
  • 2 pounds chicken breast, cubed
  • 1 large onion, finely chopped
  • 4 garlic cloves, minced
  • 2 Tbsp fresh ginger, grated
  • 1 (29 oz) can tomato sauce
  • 2 Tbsp olive oil
  • 1 Tbsp Garam Masala
  • 2 tsp ground cumin
  • 2 tsp ground coriander
  • 2 tsp paprika
  • 1 tsp turmeric
  • 1/2 tsp ground cinnamon
  • 1/2 tsp cayenne pepper
  • 1/2 tsp ground black pepper
  • 2 bay leaves

  • 1/2 cup heavy cream or full fat coconut milk
  • 2 Tbsp arrowroot powder or corn starch
  • juice of 1/2 a lemon
Cooking Directions
  1. Place all the ingredients except the bay leaves, heavy cream, arrowroot powder and lemon juice in a bowl and mix together until the chicken is well coated.
  2. Rub the inside of your slow cooker with olive oil.
  3. Pour the ingredients into the slow cooker and place the bay leaves on top. Cook on low for 8 hours on low or 4 hours on high.
  4. Mix the heavy cream with the arrowroot powder and then pour into the crock-pot and mix together. Cook for an additional 20 minutes.
  5. Pour in the lemon juice right before serving.

October 28, 2014

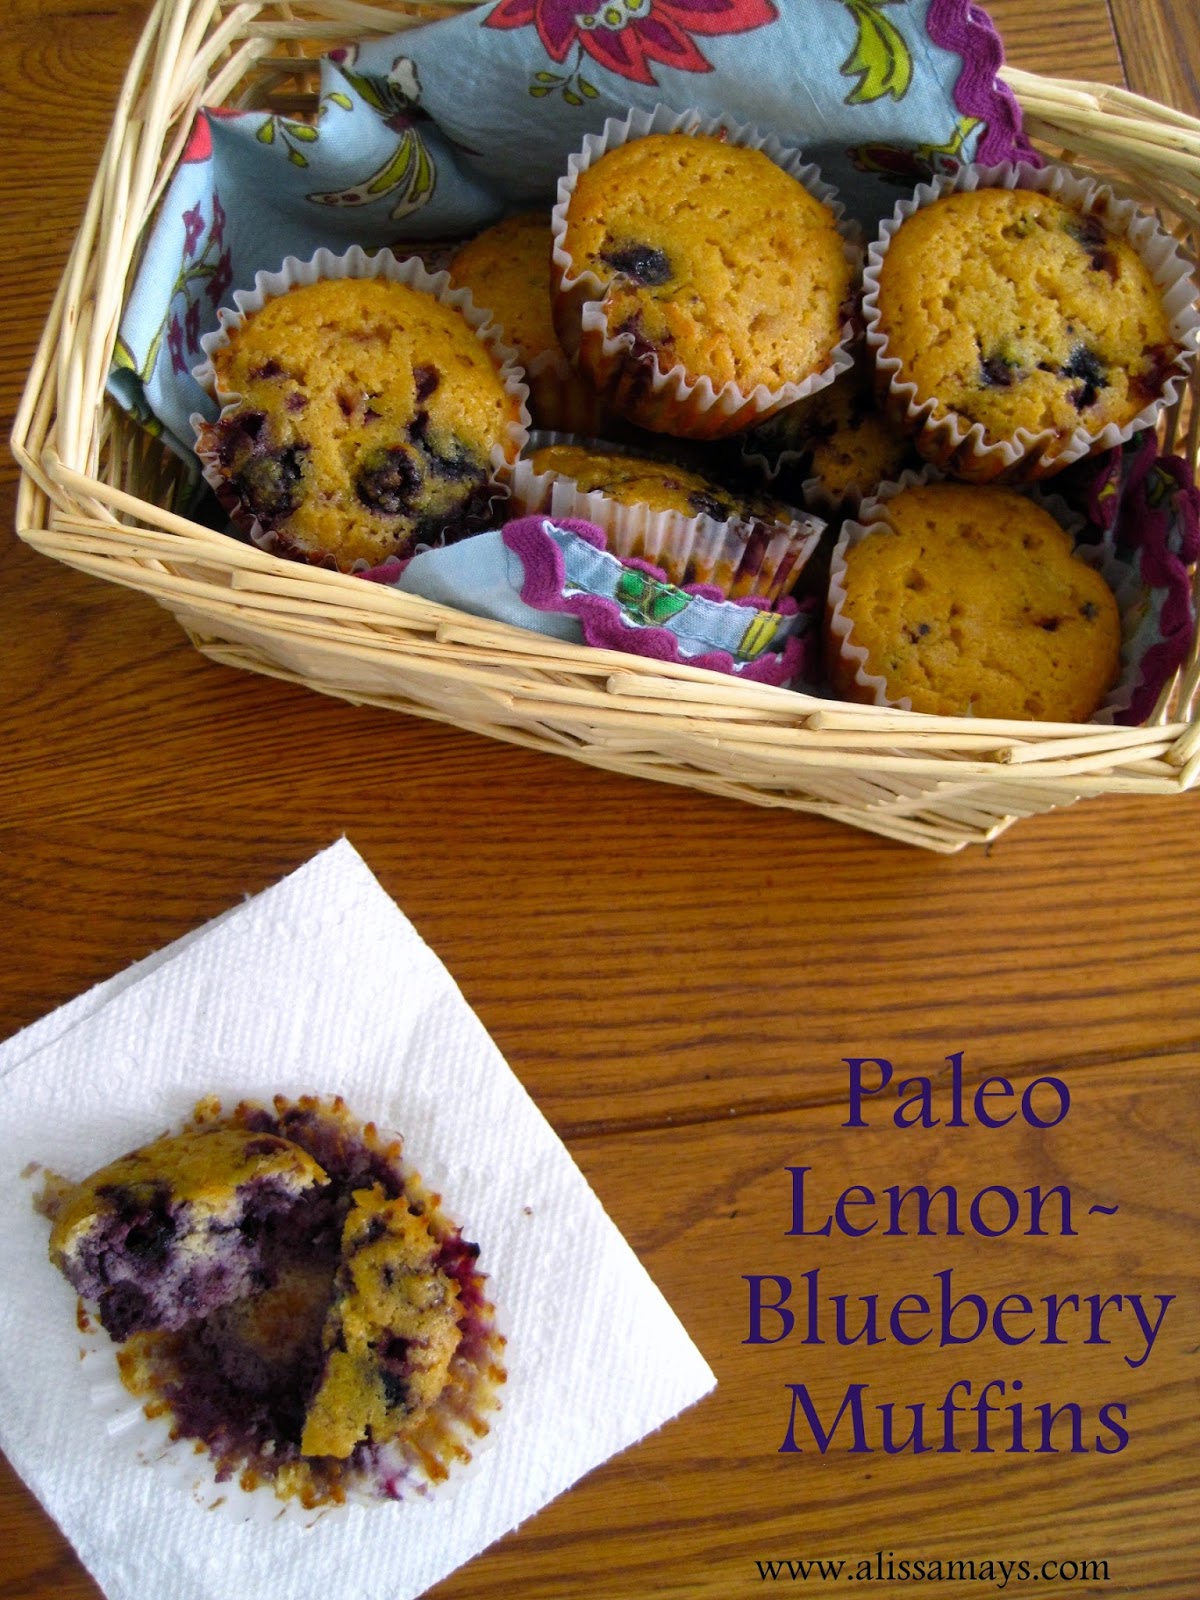
Paleo Lemon-Blueberry Muffins


As you may or may not know, I've been doing an eating plan called Whole30.  Whole30 is slightly different from Paleo, but it's close enough that you can use many of the same recipes. So, I happen to have a Paleo cookbook in my possession.  Lucky for me, because some mornings I just don't have time to cook an omelet or make some bacon.

Coconut flour is the key to this recipe.  If you're not having any luck finding any it's because it depends on your grocery store as to it's placement. I bought the Bob's Red Mill brand and I saw that some grocery stores had it in the flour section while others had a gluten free section and still others had a Bob's Red Mill section of some random isle. I'd just ask when you first walk in and save yourself some frustration.

There was some unapproved Whole30 ingredients in this recipe that I want to reveal to you now. You aren't supposed to have maple syrup or vanilla extract.  I've already done my 30 days and so I didn't feel that the minor cheats in this recipe would hurt that much.

This recipe is very different from a traditional lemon-blueberry muffin.  Good, but very different. We get so accustomed to the sweet flavors and the taste of all-purpose flour of regular muffins that sometimes it takes a while to get ourselves off those flavors.  The good news is that in my opinion this muffin had a nice sweet flavor, and the blueberries were perfect.  The lemon flavor was very mild and the texture is different but not in a bad way from a regular muffin. Not as fluffy but still moist.

Great alternative to the meat or eggs I have gotten used to with this eating plan.


Paleo Lemon-Blueberry Muffins
Recipe from Practical Paleo page 246


Ingredients
  • 6 whole eggs
  • 1/2 cup butter or coconut oil, melted
  • 1 tsp vanilla extract
  • 1/4 cup grade B maple syrup
  • 1 whole lemon, juiced and zest
  • 1/2 cup coconut flour
  • 1/2 tsp sea salt
  • 1/4 tsp baking soda
  • 1 cup fresh blueberries
Cooking Directions
  1. Preheat the oven to 350º
  2. In the bowl of your stand mixer with the whisk attachment, whisk the eggs, butter, coconut oil, vanilla extract, maple syrup, lemon juice and lemon peel.
  3. Sift in the coconut flour, sea salt and baking soda and stir until well combined.
  4. Fold in the blueberries.
  5. Line a muffin pan with muffin papers (natural parchment muffin papers work best) and use a 1/4 cup scoop to fill each muffin cup. Bake for 35-40 minutes.