
November 10, 2017
April 4, 2017
Chocolate Banana Bread

You know, it seems like I always have overripe bananas. Seriously, I guess I need to start buying 2 at a time. However, on that same note, I wouldn't have found my new favorite banana bread recipe if I hadn't had these overripe bananas to use up.
This bread is so stinkin good.
My daughter is always my toughest critic in the house, and she loved it! The bread was very moist, dense, and had a good dose of both banana and chocolate flavors. Perfection!
My new favorite banana bread recipe!
My new favorite banana bread recipe!
Chocolate Banana Bread
Recipe from Two Peas and Their Pod
Ingredients
- 1 cup all-purpose flour
- 1/2 cup unsweetened cocoa powder
- 1 tsp baking soda
- 1/2 tsp sea salt
- 3 large (1 1/2 cups) bananas, mashed
- 1/4 cup unsalted butter, melted and cooled slightly
- 1/4 cup canola oil, vegetable oil, or melted coconut oil
- 3/4 cup light brown sugar, packed
- 1 large egg, room temperature
- 1 tsp pure vanilla extract
- 1 cup semi-sweet chocolate chips, divided
- Preheat your oven to 350º
- Spray a 9x5 inch loaf pan with cooking spray and set aside.
- In a medium bowl, combine the dry ingredients. Flour, cocoa powder, baking soda, salt.
- In the bowl of your stand mixer, add the slightly cooled melted butter, the oil and brown sugar. Mix until smooth.
- Add the slightly beaten egg and mix, then add the vanilla.
- Slowly add the dry ingredients and mix on low until smooth. Add in 3/4 cups of chocolate chips and mix briefly.
- Pour the batter into the prepared dish and sprinkle the remaining 1/4 cup of chocolate chips over the top.
- Bake for 60-65 minutes. Use a toothpick to determine if it's done.
- Let the bread cool in the pan for 15 minutes after removing from the oven. Then run a knife around the edges and remove from the pan, let cool on a wire rack and then slice.
March 23, 2017
Rainbow Fruit Salad

Summer is approaching and that means you'll need your fair share of snacks to cool you down. This is one that you need to have in your refrigerator, for those hot days.
Of course fruit is good by itself but if you leave it cut up in your refrigerator for too long, it begins to turn strange colors. Especially those darn bananas. This recipe is great because it isn't covering up that great fruit flavor, but adding a hint of extra flavor. Coincidentally it's also helping to preserve that lovely color. Lime juice is good like that. And you can't go wring with honey, I mean, really.
This recipe is perfect for a quick snack on a hot day.
Rainbow Fruit Salad
Recipe from Buzzfeed
Ingredients
- 1 pound fresh strawberries, quartered
- 4 kiwi's, peeled and diced
- 2 mango's, peeled and diced
- 2 bananas, peeled and diced
- 12 ounces fresh blueberries
- 2 Tbsp honey
- 1 limed, juiced
- Combine the cut up fruit in a medium sized bowl. Mix together the honey and lime juice and pour over the fruit, stir. Serve at room temperature or chilled.
March 15, 2017
April's Corn and Shrimp Chowder

Be warned, this makes a huge recipe! Not kidding, you can feed 15 to 20 people easily. I recently made this at a friends house and it was amazing. Even though there were 7 of us eating it felt like we didn't even make a dent in the amount this makes. Next time, I think I'll half it.
The result was amazing, however. The chowder is thick and hearty, with tons of flavor. There are big chunks of vegetables as well as shrimp. I used a medium sized shrimp we found in the freezer section. They'd already been deveined so all we had to do was peel and take their tails off. The creamy base was thick and flavorful. I was completely satisfied after my meal. We served it with French Bread and Butter, and that was all.
The most time consuming portion of the meal was the chopping and getting the shrimp ready. Not difficult, just allow time for it.
Such a hearty filling meal, and since there were so many vegetables we didn't feel it was necessary to add a side dish. It was all made in one giant pot so clean up was pretty easy. You're going to want to make this for a crowd, and hope there are still leftovers for you to savor on your own. I loved this. My husband has declared this, one of the best chowder's he's ever had.
April's Corn and Shrimp Chowder
Recipe from April
Ingredients
- 1/2 cup (1 stick) butter
- 2 whole onions, chopped
- 2 bell peppers, chopped
- 3 ribs celery, chopped
- 1 bunch green onion, diced (for garnish)
- 1 pound bacon, cut into small pieces
- 4-5 pounds shrimp, deveined and tails removed
- 3 cans cream of corn
- 4 cans gold and white corn
- 1 can Rotel tomatoes
- 1 bunch carrots
- 4-5 pounds potatoes, cubed
- 1 quart half and half
- 1 pint whipping cream
- salt and pepper to taste
- Saute the onions, bell pepper, celery and green onions in the butter until they are beginning to soften. Remove from the pan and set aside.
- In the same pan add the bacon pieces and fry until they are crispy. Remove the bacon to a plate lined with a paper towel but leave the grease in the pan.
- Saute the shrimp in the bacon grease and remove. If you want a little bit of spice you can sprinkle shrimp with a some old bay, slap your mama, or any other seasoning to your desired spice level.
- Add all of the other ingredients (not the shrimp or the green onions) including the vegetables that were cooked and set aside and cook until the potatoes are done. You can drain the canned corn if you want a thicker chowder or leave the liquid to thin it out a bit.
- Season to taste with salt and pepper. Add the shrimp about 5 minutes before serving. Garnish with green onions.
*Some accompaniment options: Hot Sauce, Shredded Cheese, Diced Green Onion, Crispy Bacon Pieces
March 4, 2017
Lemon Ice Cream Bars

Sorry for the delay in posting this week. We had our house painted, as well as my kitchen cabinets. So needless to say, I was out of the way for most of the week. Then I unplugged my internet and had to have my husband help me fix it. So, luckilyI'm back in business now, a week later.
So, I was going through all of my old Food Network Magazine's and I discovered I had some pages marked, so I finally got around to making these.
I'm telling you, theses are g.o.o.d. The lemon curd is nice and tart but easily gets sweetened up by the ice cream. The crust is crumbly and delicious, a good combination of sweetness with a little hint of lemon. Great recipe to have for the upcoming summer!
Lemon Ice Cream Bars
Recipe from Food Network Magazine. Jan/Feb 2014 page 64
Ingredients
- 6 large egg yolks
- 1 cup granulated sugar
- 1 cup fresh lemon juice
- 12 Tbsp unsalted butter, cut into small pieces
- 1/2 tsp lemon zest
- pinch of salt
- cooking spray
- 2 5-6 oz shortbread cookies
- 3 Tbsp unsalted butter, melted
- 1/2 tsp lemon zest
- 2 pints vanilla ice cream, softened slightly
- confectioners' sugar, for dusting
- Make the lemon curd first. In a saucepan, combine the egg yolks, sugar and lemon juice. Cook over medium heat until it begins to thicken.
- Add in chunks of butter until smooth and let thicken until it covers the back of a wooden spoon. Remove from heat.
- Strain through a fine mesh seive. Then add the lemon zest and salt and let cool.
- Spray a 9x9 or 8x8 inch dish with cooking spray. Line it with aluminum foil so there is over hang on the sides, then spray again.
- In a food processor, add all the cookies and pulse it until they are all crushed. Slowly add in the melted butter and and lemon zest and pulse a couple more times.
- Press the cookie mixture into the bottom of the prepared dish, use your hands to make it even and press down firmly.
- Press the lightly softened ice cream on top of the cookie crust. Press down and even out the top as much as possible.
- Pour the lemon curd over the top and smooth out. Lay a sheet of plastic wrap over the top and place in freezer for a minimum of 4 hours.
- When ready to serve, grab the ends of the aluminum foil and lift out of dish. Cut into squares and serve.
February 22, 2017
Chewy Hermits

If you've ever spent any time in New England, you might have had a Hermit. These are chewy, spiced cookies with big plump raisins that remind you of the holidays. Hermits can be found in New England at any time of year, they are favorites there.
When I married my husband and went to visit New England for the first time, I was quickly introduced to these, as well as other New England favorites.
They've quickly become favorites of mine. My husband already loved them and now our daughter does too.
I've discovered that these cookies can be made in three basic shapes. The regular cookie, the bar cookie and the long thick rope shape that is then cut into half moon slices. All are good, trust me.
In my research I discovered that Hermits were added to a local cookbook from the Trinity Church out of New York called Champlain Valley Book of Recipes, where this recipe was called Miss Perloa's Hermits in 1880. Miss Perloa had a cookbook called "Appledore Cook Book" in which she had some cookie type recipes but none were labeled as a "cookie". That same year another cookbook was published with her recipe for Hermits called "Miss Perloa's New Cook Book".
Since the time of the original recipe, it's been revised countless times. I personally have never come up with my own version of this recipe but I'm glad I get to experience other people's masterpieces. I loved this recipe by The Lemon Bowl. Nice and chewy, tons of flavor and lots of raisins. Delicious!
Chewy Hermits
Recipe from The Lemon Bowl
Ingredients
- 4 cups all-purpose flour
- 2 tsp ground cinnamon
- 1 tsp baking soda
- 1 tsp baking powder
- 1 tsp ground ginger
- 1/2 tsp ground nutmeg
- 1/2 tsp salt
- 1/4 tsp ground cloves
- 2 cups light brown sugar, packed
- 1 cup (2 sticks) unsalted butter, softened
- 2/3 cup dark molasses syrup
- 1 large eggs
- 2 cups raisins
- Preheat the oven to 350º
- Spray a standard jelly roll sheet (cookie sheet with sides) with non-stick spray, set aside.
- In a medium sized mixing bowl, whisk together the dry ingredients. The flour, cinnamon, baking soda, baking powder, ground ginger, ground nutmeg, salt and cloves.
- In the bowl of your stand mixer, add the butter and the brown sugar and mix until light and fluffy on medium speed.
- Add the molasses and mix.
- Add the eggs one at a time and mix.
- Slowly add the dry ingredients with the mixer on low speed. Once blended add the raisins.
- Spread the dough out on the prepared sheet pan and level out so it's the same thickness throughout. Use your hands.
- Bake for 17-19 minutes, until a toothpick inserted in the middle comes out clean.
- Let cool before cutting into squares.
February 13, 2017
Apricot Orange Chocolate Chip Cookies

So, there I was, munching away on dried apricots, when it hit me! The flavors for my next cookie! Chocolate and apricot are a match made in heaven. So is orange and chocolate. So why not incorporate them into a delicious chewy cookies with little chewy chunks of goodness.
The base of this recipe came from Pinterest. I knew I wanted this to be a chewy cookie. I also knew that I'd be using chocolate chips, so the base of this cookie is a yummy chocolate chip cookie that I found and have made once before. Then it was just a matter of adding in the other flavors I wanted.
I was able to control myself long enough to wait until they cooled out of the oven. This is needed in order to achieve optimal chewiness. Mission accomplished! Perfectly chewy, large, full of flavor. The orange flavor is not too strong but pairs well with the apricots and the chocolate chips. The small chunks of apricots are a wonderful addition. I'm in love with this cookie.
Apricot Orange Chocolate Chip Cookies
Modified from Host The Toast
Ingredients
- 2 cups + 2 Tbsp all-purpose flour
- 1 tsp baking soda
- 2 tsp cornstarch
- 1/2 tsp salt
- zest of 1 orange
- 1 1/2 sticks unsalted butter, melted and cooled
- 1 cup brown sugar, lightly packed
- 1/2 cup granulated sugar
- 2 whole eggs
- 2 tsp orange juice
- 3/4 cup mini semi-sweet chocolate chips
- 3/4 cup dried apricots, finely diced
- In a medium sized bowl, add the flour, baking soda, cornstarch, orange zest and salt. Whisk together and set aside.
- In the bowl of your stand mixer, add the sugars and cooled butter and beat for 1 minute.
- Add in the eggs, one at a time, and the orange juice. Mix.
- Slowly add the dry ingredients in and mix until combined.
- Add in the chocolate chips and apricot pieces and stir until combined. Refrigerate for at least 30 minutes.
- Let your oven preheat to 325º
- Line two cookie sheets with parchment paper
- Scoop out 1/4 cup of dough and place on a cookie sheet. Leave room for them to spread out while cooking
- Bake for 12-18 minutes, rotating once halfway through. Remove when the edges are golden brown
- Let sit on the cookie sheet for about 5 minutes before removing to a wire rack
February 8, 2017
Panera Bread Macaroni and Cheese

As part of my ongoing quest to make homemade macaroni and cheese that my daughter will actually eat, I tried this new one last night.
I figured this was a sure winner, since she loves Panera Macaroni and Cheese.
I was wrong about her liking it, but I LOVED it.
Is it wrong that I'm actually happy she didn't like it, so I can have the rest? Her reasons for not liking it were: The consistency was thicker than the store version. So, the flavor was a match but because I let it cool down (and it thickened) she wouldn't eat it. This is the story of my life. Do you feel sorry for me?
Well, obviously you just have to add a little more milk to get the consistency to thin out but she'd already determined that it wasn't right and therefore nothing would change her mind.
It's OK, I'll eat it.
Panera Bread Macaroni and Cheese
Recipe from Food Folks and Fun
Ingredients
- 16 oz rigati pasta
- 1/4 cup unsalted butter
- 1/4 cup all-purpose flour
- 2 1/2 cups milk (2% or whole)
- 6 slices American cheese (white) cut into strips
- 8 oz extra sharp cheddar (white) grated
- 1/2 tsp dijon mustard
- 1 tsp kosher salt
- 1/4 tsp hot sauce
- Boil the pasta according to package directions.
- Meanwhile, in a medium saucepan melt the butter. Add the flour and whisk constantly for 1 minute. Add the milk and whisk until thick. Add the cheese and stir until melted. Now turn off the heat and add the mustard, salt and hot sauce.
- Add the cooked, drained pasta and stir well.
- Serve hot
January 25, 2017
Rosebud's Bread

As you've probably guessed, I sort of like trying new recipes. I mean, I have a fantastic recipe for bread that I use all of the time but why not try a new one, right?
This one is a Pinterest find and it's pretty darn good. I just made it yesterday but its still moist and delicious. The original recipe was for white bread but I added about half white wheat flour just to get some of that nutrition into it.
There isn't a ton of flavor (which is kinda the point of bread, in my opinion) I mean, don't you really want to taste what you're putting inside of your sandwich or on top your toast? So I like it. My other recipe for bread has honey in it so you get a little more flavor, however, my other recipe doesn't rise up and get as big as this one does. However, I love the texture. It's moist and holds together well for a sandwich.

Rosebud's Bread
Recipe from The Curry Carrot
Ingredients
- 4 1/2 tsp (two packets) active dry yeast
- 3/4 cup warm water
- 1/4 cup granulated sugar
- 1 Tbsp salt
- 3 Tbsp unsalted butter
- 2 3/4 cup additional warm water
- 9-10 cups all-purpose flour (i use King Arthur)
- 4 Tbsp unsalted butter, melted
- extra spray or butter for greasing
- In the bowl of your stand mixer add the yeast and 3/4 cup water. Let sit for 5 minutes.
- Add to the yeast mixture, sugar, salt, unsalted butter and the remaining water and mix.
- Add 5 cups of flour, slowly, until mixture becomes smooth. Slowly add in the remaining flour until it becomes smooth.
- Switch to the dough hook and knead in your mixer for 10 minutes. Alternatively, this amount of dough might be hard on your mixer unless you have a large or professional mixer. So you can also knead on a floured work surface.
- Put dough into a large greased bowl and cover with either a floured towel or plastic wrap for about an hour. Set in a warm spot.
- Punch down dough and cut into two even sized pieces. Working with one at a time, roll out to about a 12x12 sized square and make sure it's a uniform thickness. Now tightly roll the dough into a roll, pinch together the ends and place it seam side down in a greased 9" loaf pan. Do the same to the remaining dough and cover. Let sit a warm place for another hour to rise.
- Preheat the oven to 425º
- Bake both loaves in the preheated oven for 15 minutes, then cover with tin foil and bake for another 15 minutes so they don't get too dark. Remove from the oven and let cool in the loaf pans, then remove from pans to a wire rack.
January 16, 2017
Banana and Chocolate Chip Oatmeal Muffins

I know I haven't posted much lately, and here's why. It's the New Year and of course we're trying to eat better in my house. My husband is gluten free and I'm just sort of doing my own thing but all of us are trying to eliminate sugar from out lives. So, sadly I haven't had much that's interesting to cook. I mean, you probably don't need to read about me making a grilled steak or chicken but slowly I'm finding more recipes that we can all eat.
Like this one.
Sweetened with maple syrup (love), gluten free, and my daughter's favorite flavor combination! We're all happy with this one. My daughter ate two right out of the oven, which she never does. She even knew they were good for her! I think the banana chocolate chip flavor won her over. I also let her make these, pretty much all by herself (not the oven part) and I think that helped also (she's super picky).

I loved that these muffins stay nice and moist, yet have a great texture from the oatmeal. I used old fashioned oats and there is a nice chew with those. Plenty of banana flavor and chocolate chips. My favorite part about these muffins is that they are the perfect amount of sweetness, and there's no sugar in them! This will definitely become a favorite in my house, for everyone!
Banana and Chocolate Chip Oatmeal Muffins
Recipe from Organize Yourself Skinny
Ingredients
- 3 cups quick or old fashioned oats
- 1/2 tsp ground cinnamon
- 1/8 tsp ground nutmeg
- 1 tsp baking powder
- 1/4 tsp salt
- 2 large eggs
- 1/4 cup pure maple syrup
- 1 cup (2 large) bananas, mashed
- 2 tsp vanilla extract
- 1 cup 1% milk
- 1/4 cup coconut oil, melted
- 1 cup mini chocolate chips
- cooking spray
- Preheat the oven to 350º
- spray a muffin pan with non-stick spray, set aside .
- In a medium bowl add the oats, cinnamon, nutmeg, baking powder and salt and set aside.
- In another bowl, whisk together the eggs, bananas, vanilla extract, and milk until smooth.
- Add the oats into the wet ingredients and mix well, then add the coconut oil and chocolate chips and mix.
- Fill each muffin cup with an equal amount of batter and bake for 30 minutes. Let cool slightly before removing to a wire cooling rack.
- These can be frozen or refrigerated.
January 5, 2017
Top 5 of 2016
This past year, there were some defining favorites for my viewers. There was a significant number in views on these recipes, more than any other. I love being able to share my cooking trials with you all, thank you for your support! I can't wait to see what 2017 brings!
5.

4.

3.

2.

1.

5.

Who can blame you all for this choice, I mean, soft delicious fudge in 3 minutes. Yep, and it's so good! Find the recipe here
4.
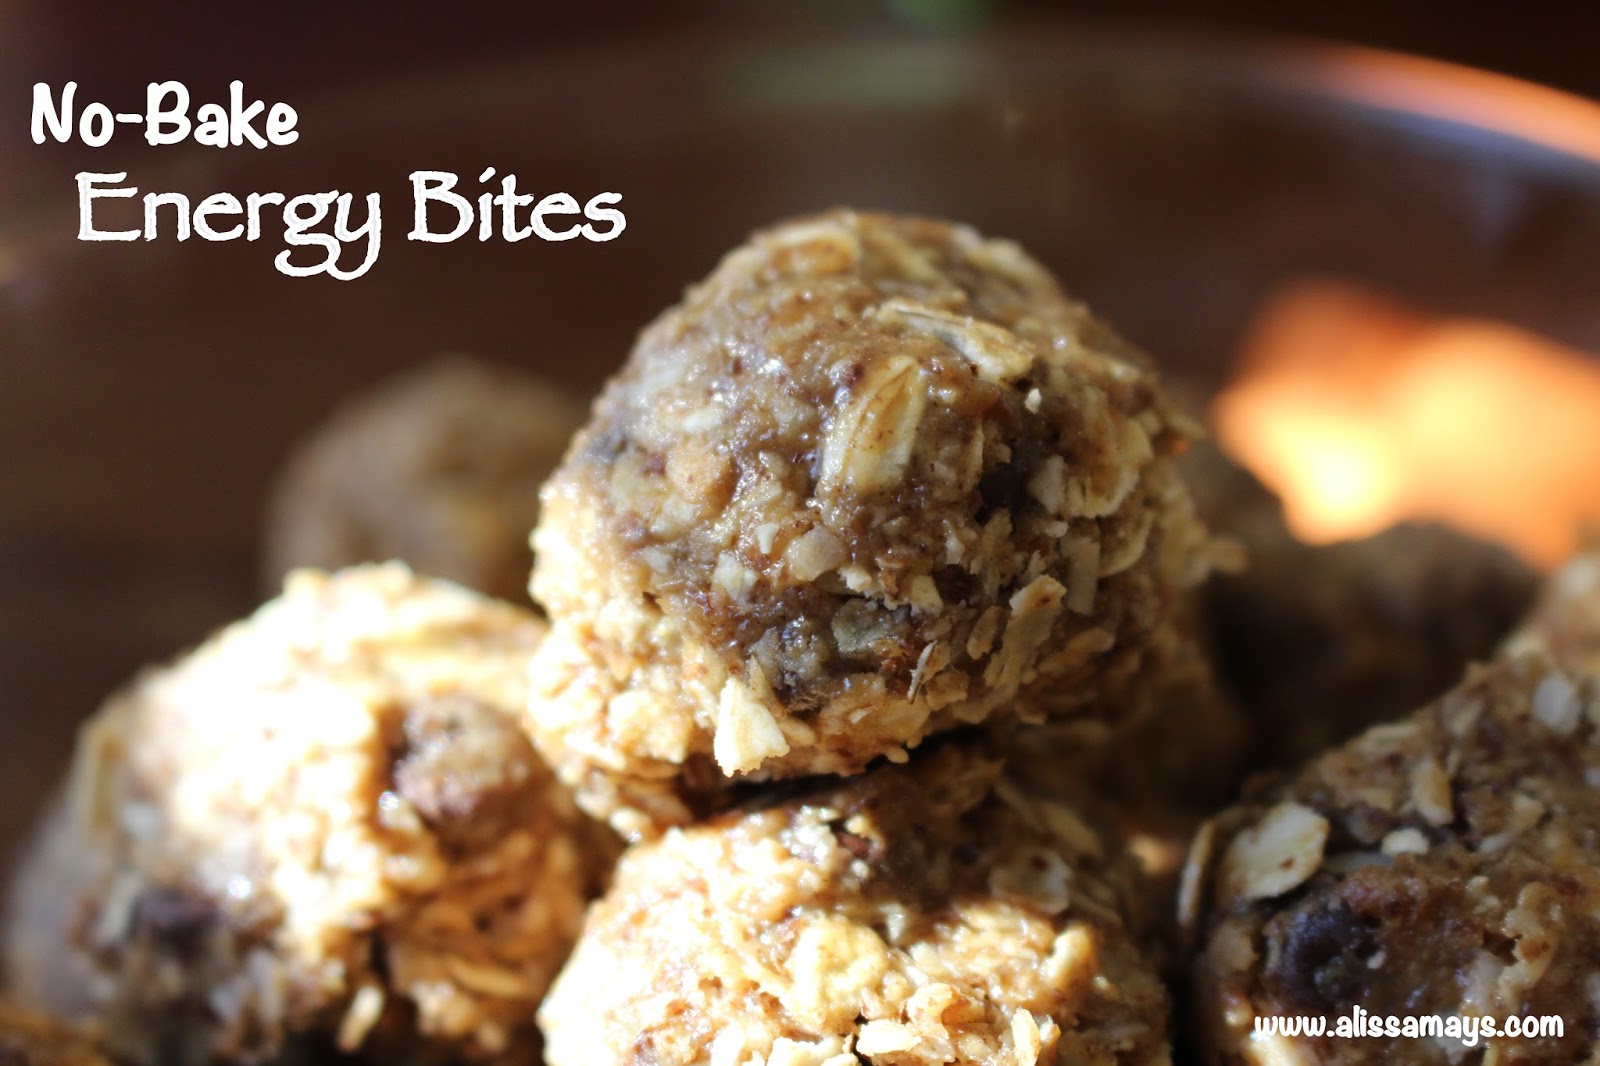
We're all on a diet now, right? OK, not all of us but who couldn't use a little extra energy during the day? Find the recipe here
3.

These little candies are totally worth their name. Delicious and not hard to make, I can see why they're of of your favorites. Find the recipe here
2.

These little gems were a quick hit, I only posted this recipe a couple of months ago and they're already in the number 2 spot. I decorated a cheesecake with them but I snacked on all the rest.
Find the recipe here
1.

The number one favorite recipe was this brownie! They're healthy and delicious. No really, they're healthy. Find the recipe here
Subscribe to:
Posts (Atom)