Showing posts with label Dessert. Show all posts

March 4, 2017

Lemon Ice Cream Bars


Sorry for the delay in posting this week.  We had our house painted, as well as my kitchen cabinets.  So needless to say, I was out of the way for most of the week.  Then I unplugged my internet and had to have my husband help me fix it.  So, luckilyI'm back in business now, a week later.

So, I was going through all of my old Food Network Magazine's and I discovered I had some pages marked, so I finally got around to making these.

I'm telling you, theses are g.o.o.d.  The lemon curd is nice and tart but easily gets sweetened up by the ice cream.  The crust is crumbly and delicious, a good combination of sweetness with a little hint of lemon.  Great recipe to have for the upcoming summer!


Lemon Ice Cream Bars
Recipe from Food Network Magazine. Jan/Feb 2014 page 64


Ingredients
  • 6 large egg yolks
  • 1 cup granulated sugar
  • 1 cup fresh lemon juice
  • 12 Tbsp unsalted butter, cut into small pieces
  • 1/2 tsp lemon zest
  • pinch of salt
  • cooking spray
  • 2 5-6 oz shortbread cookies
  • 3 Tbsp unsalted butter, melted
  • 1/2 tsp lemon zest
  • 2 pints vanilla ice cream, softened slightly
  • confectioners' sugar, for dusting
Cooking Directions
  1. Make the lemon curd first. In a saucepan, combine the egg yolks, sugar and lemon juice.  Cook over medium heat until it begins to thicken. 
  2. Add in chunks of butter until smooth and let thicken until it covers the back of a wooden spoon. Remove from heat.
  3. Strain through a fine mesh seive.  Then add the lemon zest and salt and let cool. 
  4. Spray a 9x9 or 8x8 inch dish with cooking spray.  Line it with aluminum foil so there is over hang on the sides, then spray again. 
  5. In a food processor, add all the cookies and pulse it until they are all crushed.  Slowly add in the melted butter and and lemon zest and  pulse a couple more times. 
  6. Press the cookie mixture into the bottom of the prepared dish, use your hands to make it even and press down firmly. 
  7. Press the lightly softened ice cream on top of the cookie crust.  Press down and even out the top as much as possible. 
  8. Pour the lemon curd over the top and smooth out.  Lay a sheet of plastic wrap over the top and place in freezer for a minimum of 4 hours. 
  9. When ready to serve, grab the ends of the aluminum foil and lift out of dish. Cut into squares and serve. 

February 22, 2017

Chewy Hermits


If you've ever spent any time in New England, you might have had a Hermit.  These are chewy, spiced cookies with big plump raisins that remind you of the holidays.  Hermits can be found in New England at any time of year, they are favorites there.

When I married my husband and went to visit New England for the first time, I was quickly introduced to these, as well as other New England favorites.

They've quickly become favorites of mine.  My husband already loved them and now our daughter does too.

I've discovered that these cookies can be made in three basic shapes.  The regular cookie, the bar cookie and the long thick rope shape that is then cut into half moon slices.  All are good, trust me.

In my research I discovered that Hermits were added to a local cookbook from the Trinity Church out of New York called Champlain Valley Book of Recipes, where this recipe was called Miss Perloa's Hermits in 1880.  Miss Perloa had a cookbook called "Appledore Cook Book" in which she had some cookie type recipes but none were labeled as a "cookie".  That same year another cookbook was published with her recipe for Hermits called "Miss Perloa's New Cook Book".

Since the time of the original recipe, it's been revised countless times.  I personally have never come up with my own version of this recipe but I'm glad I get to experience other people's masterpieces. I loved this recipe by The Lemon Bowl.  Nice and chewy, tons of flavor and lots of raisins. Delicious!

Chewy Hermits
Recipe from The Lemon Bowl


Ingredients
  • 4 cups all-purpose flour
  • 2 tsp ground cinnamon
  • 1 tsp baking soda
  • 1 tsp baking powder
  • 1 tsp ground ginger
  • 1/2 tsp ground nutmeg
  • 1/2 tsp salt
  • 1/4 tsp ground cloves
  • 2 cups light brown sugar, packed
  • 1 cup (2 sticks) unsalted butter, softened
  • 2/3 cup dark molasses syrup
  • 1 large eggs
  • 2 cups raisins
Cooking Directions
  1. Preheat the oven to 350º
  2. Spray a standard jelly roll sheet (cookie sheet with sides) with non-stick spray, set aside.
  3. In a medium sized mixing bowl, whisk together the dry ingredients. The flour, cinnamon, baking soda, baking powder, ground ginger, ground nutmeg, salt and cloves.
  4. In the bowl of your stand mixer, add the butter and the brown sugar and mix until light and fluffy on medium speed.
  5. Add the molasses and mix.
  6. Add the eggs one at a time and mix.
  7. Slowly add the dry ingredients with the mixer on low speed. Once blended add the raisins.
  8. Spread the dough out on the prepared sheet pan and level out so it's the same thickness throughout. Use your hands.
  9. Bake for 17-19 minutes, until a toothpick inserted in the middle comes out clean.
  10. Let cool before cutting into squares.

February 13, 2017

Apricot Orange Chocolate Chip Cookies


So, there I was, munching away on dried apricots, when it hit me!  The flavors for my next cookie! Chocolate and apricot are a match made in heaven. So is orange and chocolate. So why not incorporate them into a delicious chewy cookies with little chewy chunks of goodness. 

The base of this recipe came from Pinterest.  I knew I wanted this to be a chewy cookie.  I also knew that I'd be using chocolate chips, so the base of this cookie is a yummy chocolate chip cookie that I found and have made once before.  Then it was just a matter of adding in the other flavors I wanted. 

I was able to control myself long enough to wait until they cooled out of the oven.  This is needed in order to achieve optimal chewiness. Mission accomplished!  Perfectly chewy, large, full of flavor.  The orange flavor is not too strong but pairs well with the apricots and the chocolate chips.  The small chunks of apricots are a wonderful addition.  I'm in love with this cookie.  

Apricot Orange Chocolate Chip Cookies
Modified from Host The Toast


Ingredients
  • 2 cups + 2 Tbsp all-purpose flour
  • 1 tsp baking soda
  • 2 tsp cornstarch
  • 1/2 tsp salt
  • zest of 1 orange
  • 1 1/2 sticks unsalted butter, melted and cooled
  • 1 cup brown sugar, lightly packed
  • 1/2 cup granulated sugar
  • 2 whole eggs
  • 2 tsp orange juice
  • 3/4 cup mini semi-sweet chocolate chips
  • 3/4 cup dried apricots, finely diced
Cooking Directions
  1. In a medium sized bowl, add the flour, baking soda, cornstarch, orange zest and salt. Whisk together and set aside.
  2. In the bowl of your stand mixer, add the sugars and cooled butter and beat for 1 minute.
  3. Add in the eggs, one at a time, and the orange juice. Mix.
  4. Slowly add the dry ingredients in and mix until combined.
  5. Add in the chocolate chips and apricot pieces and stir until combined. Refrigerate for at least 30 minutes.
  6. Let your oven preheat to 325º
  7. Line two cookie sheets with parchment paper
  8. Scoop out 1/4 cup of dough and place on a cookie sheet. Leave room for them to spread out while cooking
  9. Bake for 12-18 minutes, rotating once halfway through. Remove when the edges are golden brown
  10. Let sit on the cookie sheet for about 5 minutes before removing to a wire rack

January 5, 2017

Top 5 of 2016

This past year, there were some defining favorites for my viewers.  There was a significant number in views on these recipes, more than any other.  I love being able to share my cooking trials with you all, thank you for your support!  I can't wait to see what 2017 brings!

5.

Who can blame you all for this choice, I mean, soft delicious fudge in 3 minutes.  Yep, and it's so good!  Find the recipe here

4.

We're all on a diet now, right? OK, not all of us but who couldn't use a little extra energy during the day? Find the recipe here


3.

These little candies are totally worth their name.  Delicious and not hard to make, I can see why they're of of your favorites.  Find the recipe here

2.

These little gems were a quick hit, I only posted this recipe a couple of months ago and they're already in the number 2 spot.  I decorated a cheesecake with them but I snacked on all the rest.  
Find the recipe here

1. 

The number one favorite recipe was this brownie!  They're healthy and delicious.  No really, they're healthy.  Find the recipe here

December 28, 2016

No-Bake Avalanche Cookies


So, this recipe was recently going around Facebook, and I thought, man those look good. And they're no bake, it was like they were begging me to make them. 

I'm really, really glad I did. 

These cookies are the bomb.  Easy to make and they stay delicious for a while after you make them too.  No stale cookies here, no sir, these taste just as good as they did the day they were made.  Oh, and I already had all the ingredients in the house, so Win! Win!


These Avalanche cookies have a soft texture, like fudge.  But they also have the wonderful texture of the Rice Krispies and the marshmallows. The peanut butter flavor is mild because it's mixed with white chocolate, but still noticeable.

Just an all around awesome cookie in my book, this one is going in "my favorites" section.  Yum!

No-Bake Avalanche Cookies


Ingredients
  • 16 oz vanilla flavored almond bark/CandiQuick
  • 15 oz creamy peanut butter
  • 2 cups Rice Krispies cereal
  • 1 1/2 cups mini-marshmallows
  • 1/2 cup + more for sprinkling mini chocolate chips
Cooking Directions
  1. In a large microwavable bowl, melt the almond bark in 30 second increments in your microwave until smooth.
  2. Add the peanut butter and stir until smooth.
  3. Add the Rice Krispies, marshmallows and chocolate chips and stir until evenly distributed.
  4. Line 2 cookie sheets with wax paper and then scoop a large amount (about the size of a small orange) of the mixture into a ball shape and place on the wax paper.
  5. Sprinkle more mini chocolate chips over the top if desired.
  6. Let sit in a cool area until hardened, you can also refrigerate until set.

December 14, 2016

Gluten Free Chocolate Cake


So, let me start off by apologizing for the lack of posts.  See, Thanksgiving happened and then soon after that I started to get word that my gramma wasn't doing well.  Well, I'm in South Carolina and she's in Montana so I was sort of playing it by ear.  When the call came that it had gotten more serious, me and my daughter jumped on a plane and flew to Montana.  My gramma passed away at the age of 96, so it was expected but still difficult.  So, that's why there hasn't been any posts from me lately.  But I'm back and ready to hit the kitchen again!

This recipe was made before I left.  My husband, as you may or may not know, is on a gluten free diet as it greatly helps with his asthma.  

This cake had great chocolatey flavor.  It's more dense than your average flour cake but I didn't mind it and neither did my husband and daughter.  It didn't last long in this house! Because, when you're craving chocolate cake you just gotta have it!


I just used a store bought gluten free frosting but homemade would be delicious too.  I'm glad I tried this recipe and now have one more for my gluten free recipe box!


Gluten Free Chocolate Cake
Recipe from Hershey


Ingredients
  • 2 cups granulated sugar
  • 1 3/4 cup gluten free flour mix
  • 3/4 cup cocoa powder
  • 1 tsp salt
  • 1/4 tsp baking soda
  • 1/4 tsp baking powder
  • 2 large eggs
  • 1 cup milk
  • 1/2 cup vegetable oil
  • 2 tsp vanilla extract
  • 1 cup boiling water
Cooking Directions
  1. Preheat the oven to 350º
  2. Spray 2 9-inch cake pans with non-stick spray and then dust with cocoa powder.
  3. Mix all of the dry ingredients together in a large bowl and whisk together. Add the eggs and milk and stir, then add the remaining ingredients and mix until smooth and lump free.
  4. Pour into the prepared cake pans. Place in the oven and bake for 35-60 minutes, or until a toothpick inserted in the middle comes out clean.
  5. Remove from the oven and let cool on a cooling rack. After about 5 minutes you can run a knife along the edges and then remove so a cooling rack to cool completely before frosting.

November 23, 2016

Crustless Cheesecake with Cranberry Sauce


Happy Thanksgiving everyone!  Okay, a day early.  Well, my family actually had our Thanksgiving yesterday because my husband had to run off to work today, we it's over for us. But, it worked out perfectly because now I can get you this recipe just in time!

So, my husband is Gluten Free so this recipe caught my eye right away, then I saw the addition of cranberry flavors and I knew this was it.  I was a little hesitant because if there's no crust, how does the cheesecake keep it's shape? Well, it worked perfectly.  It holds it's shape without being hard at all.  In fact, it's so smooth and buttery I can hardly stop eating the leftovers. 

There are only a few ingredients and it comes together so nicely.  If you've got room on your table for one more dessert, this has got to be it. 


Crustless Cheesecake with Cranberry Sauce
Recipe from BHG


Ingredients
  • 4 (8 oz) cream cheese, softened
  • 1 cup granulated sugar
  • 3 large eggs
  • 1 tsp vanilla extract
  • cranberry sauce (optional)
  • sugared cranberries (optional)
Cooking Directions
  1. Preheat the oven to 275º
  2. Spray an 8 inch springform pan with non-stick spray and wrap the bottom with aluminum foil.
  3. In the bowl of your stand mixer, add the cream cheese and sugar and mix on medium high for about 8-10 minutes or until the sugar has dissolved.
  4. Add the eggs and vanilla extract and mix until combined.
  5. Pour the mixture into the prepared pan and place into a shallow roasting pan. Put the roasting pan on the oven rack and add boiling water to the roasting pan until it's about halfway up the side of the springform pan. Bake for 70-75 minutes.
  6. The cheesecake is done when the center is almost set. If you bump the side of the springform pan you should just barely see a jiggle in the center.
  7. Remove from the oven and take out of the water, remove the aluminum foil and let the cake sit for about 10 minutes.
  8. Run a sharp knife along the edges of the pan and then unbuckle the spring form pan and carefully remove it from the cheesecake. Let the cake cool completely on a cooling rack.
  9. If you're using the cranberry topping: Pour the canned, jellied cranberry sauce into a blender and liquefy it. Pour it over the top of the cheesecake and decorate with sugared cranberries.
  10. Refrigerate leftovers.

October 26, 2016

Gluten Free Carrot Cake


I'm completely in love with this recipe.  It's seriously delish.  You can't even tell it's gluten free I swear to you.

Moist (sorry for those of you who hate that word), delicious cinnamon notes and the cream cheese frosting is just yum.  I think I need to make another one ASAP.

After my husband went gluten free I was thinking I'd miss out on all those yummy carbs, but you can still eat yummy carbs this way too.  No loss of flavor here.  Easy to throw together and yummy.  You can't beat it.


Gluten Free Carrot Cake
Recipe from About Food


Ingredients
  • 2 cups granulated sugar
  • 4 whole eggs
  • 1 1/2 cups light olive oil or vegetable oil
  • 2 tsp vanilla extract
  • 2 cups all-purpose gluten free flour mix
  • 2 tsp baking soda
  • 2 tsp baking powder
  • 2 tsp cinnamon
  • 1 tsp salt
  • 1 cup chopped nuts or raisins (optional)
  • 3 cups freshly grated carrots
Frosting: 
  • 4 Tbsp unsalted butter, softened
  • 3 ounces cream cheese, softened
  • 1 tsp vanilla extract
  • 2 1/2 cups gluten free powdered sugar
Cooking Directions
  1. Preheat the oven to 350º
  2. You will need either 2-9" round cake pans, 1-9x13 inch dish or 36 muffin cups. Spray with non-stick cooking spray. If using cake pans, line the bottoms of each with parchment paper and then spray with non-stick spray. Set aside.
  3. Add the sugar and eggs to a stand mixer and blend until smooth, then add the oil and vanilla extract. Mix until smooth. 
  4. In a separate bowl add the dry ingredients: Flour, baking soda, baking powder, cinnamon and salt. Slowly add this to the wet mixture and mix just until smooth. 
  5. Stir in the carrots and raisins or nuts or neither. 
  6. Pour into the prepared pan and bake. Bake for 45-55 minutes for all pans other than the muffins.  For the muffins bake for 30-35 minutes. Insert a toothpick in the middle to check for doneness. 
  7. Let cool on a rack before frosring. 
  8. To make the frosting, combine all the ingredients together and mix until smooth. 

October 13, 2016

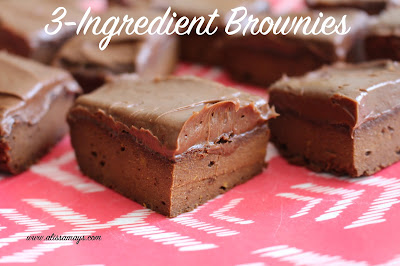
3-Ingredient Brownies


So, in my flourless dessert obsession continues.  I just can't help it!  Ok, so this recipe intrigued me because it's "healthy".  Well, in fact, it really is healthy.  I was leery, but still opted to give them a chance. 

My conclusion? 

They are surprisingly good.  I didn't add mashed banana which is one option to give them a sweeter flavor, and I used mashed sweet potato and not pumpkin so they weren't very sweet.  The frosting obviously kicks up the sweet factor and I'm anxious to try it with the banana just to see how sweet they can get and still be healthy.  

The texture is very dense and heavy.  The flavor is chocolatey, smooth texture and the sweetness comes from the frosting.  Very good.  I even shared some with my neighbor and she loved them.  It's kind of hard to believe they only have three ingredients and are actually healthy. 


3-Ingredient Brownies
Recipe from The Big Mans World


Ingredients
  • 1 cup pumpkin puree or mashed sweet potato
  • 1/2 cup drippy almond butter or any nut butter
  • 1/4 - 2/3 cup cocoa powder
Cooking Directions
  1. Preheat the oven to 350º
  2. Coat a small 4x6 or 6x6 inch loaf pan with non-stick cooking spray, set aside.
  3. Place all the ingredients in a high powered blender or food processor or in a bowl and blend until fully incorporated.
  4. Pour into the prepared loaf pan and bake for 15 minutes and then begin checking for doneness. Mine took more like 30 minutes to get done. Test with a toothpick inserted in the middle, when it comes out clean they're ready.
  5. **1/2 cup mashed banana's in place of 1/2 cup pumpkin or sweet potato will make a sweeter brownie.
  6. Frost with whatever frosting you like best. 

September 21, 2016

Fudgy Flourless Chocolate Brownies


Continuing my flourless obsession, meet the flourless brownie.  I'd like to just add that I had to make two pans of these back to back because the first pan of them disappeared so fast I couldn't photograph them.  With the second pan, I had to threaten lives not to touch them before I could take a picture. That worked but they didn't last long after that.

So, flourless desserts are yummy, easy to make, and gluten free.  I'd eat these even if they weren't gluten free.  The outside is very much like a normal flour type brownie but the middle is much softer. Sort of like eating a cookie straight out of the oven (but without all that pain).

This, being the third flourless recipe I've tried is not going to be the last.  I just love them.  Don't get me wrong, they aren't any healthier for you.  There is still sugar and butter in them.  But, sugar and butter mixed with chocolate equals deliciousness. :)

Flourless Fudgy Chocolate Brownies
Recipe from Life Made Simple


Ingredients
  • 6 Tbsp unsalted butter
  • 3/4 cup granulated sugar
  • 8 oz semi-sweet chocolate
  • 2 whole eggs at room temperature
  • 1 tsp vanilla extract
  • 1 Tbsp unsweetened cocoa powder
  • 3 Tbsp cornstarch
  • 1/4 tsp salt
Cooking Directions
  1. Preheat the oven to 350º
  2. Line a 8x8 or 9x9 inch square pan with tin foil and then spray with non-stick spray. Set aside.
  3. In a medium saucepan, over low heat melt the butter and then add the sugar. After the sugar is incorporated add the chopped chocolate. Stir until melted and smooth and then remove from the heat and beat with a hand mixer for 2 minutes.
  4. Add the eggs one at a time and then add the vanilla extract.
  5. Whisk until smooth.
  6. Use a mesh sieve to add the cocoa powder and cornstarch into the mixture. Then add the salt. Use a hand mixer to beat for another 2 minutes.
  7. Pour the batter into the prepared pan and bake for 22-30 minutes. Insert a toothpick into the middle to check for doneness. Do not overtake.
  8. Remove from the oven and let cool in the pan for at least 45 minutes before cutting.
  9. Use the tin foil to lift out of the pan and cut.

September 12, 2016

Flourless Chocolate Cake


You're looking at the reason my diet isn't going well.   My husband had a hankering for a piece of chocolate cake, so I indulged him and made this.  The great thing is that it's gluten free because it's completely flourless.  The bad thing is that it tastes amazing.  Like, thank goodness it's pretty rich or I would have eaten the whole thing myself, amazing. 

Don't confuse Gluten Free with healthy.  Just because there isn't any flour doesn't make this health food. 


It's obviously a different texture than cake.  But, because you're not substituting other flours for the wheat flour you already sort of have the expectation of a texture difference.  Instead, it's creamy all over.  It's smooth, chocolaty, and rich.  It's sort of like eating a big chocolate chip. 

Then, you add the chocolate ganashe on top (which I topped with mini chocolate chips) and it takes you into a chocolate induced coma. 


My family LOVED this cake.  In fact, I sent a piece over to my neighbor, so she made it, and her family loved it too. I'm loving all the flourless recipes I've found on Pinterest.
Grab a big glass of your favorite milk and a little piece of this heaven on a plate and enjoy!

Flourless Chocolate Cake
Recipe from Melanie Cooks


Ingredients
  • 1 cup semi-sweet chocolate chips
  • 1/2 cup (1 stick) unsalted butter
  • 3/4 cup granulated sugar
  • 3 whole eggs
  • 1/4 cup unsweetened cocoa powder
  • 2 tsp espresso powder (optional)
Chocolate Ganache
  • 1 cup semi-sweet chocolate chips
  • 1/2 cup heavy cream
Cooking Directions
  1. Preheat the oven to 375º
  2. Use a 9 inch round cake pan. Spray with non-stick spray, then line with a piece of parchment paper that has been cut to fit the bottom of the cake pan. Then spray the top of the parchment paper.
  3. Put the butter and the chocolate chips in a microwave safe bowl and heat for 1 minute, stir and keep heating in 30 second increments until smooth. This can also be done over low heat in a saucepan.
  4. Pour the chocolate mixture into a mixing bowl and add the sugar, eggs, cocoa powder and espresso powder if using. Whisk until smooth.
  5. Pour the batter into the prepared cake pan and bake for 20 minutes.
  6. Remove from the oven and let cool for 10 minutes.
  7. Run a knife around the edges of the pan to loosen, then put a plate on the top of the cake pan and flip the cake over quickly.
  8. Peel off and discard the parchment paper.
  9. Now make the ganache. Heat the chocolate chips and heavy cream in a small saucepan over medium heat, whisking until smooth.
  10. Pour over the still warm cake and use a knife to cover it completely.
  11. Refrigerate the cake for at least an hour before cutting.

August 23, 2016

Gluten Free Apple Cranberry Pie


Recently, my husband and I decided to try a Gluten Free diet.  Purely for experimental purposes.  Turns out, my husband has had amazing results.  He hasn't had any of the Asthma problems he usually has on a daily basis.  No inhaler needed for weeks. I haven't been on it as long so I haven't noticed anything yet but we'll see.

Anyways, we've gotten a couple of cookbooks to help us out and we've tried a couple of great recipes lately. Some of you might be wondering what Gluten is exactly.  Well here you go:
  1. a substance present in cereal grains, especially wheat, that is responsible for the elastic texture of dough. A mixture of two proteins, it causes illness in people with celiac disease.

So, Gluten can also just be a sensitivity in some people which apparently it is in my husband and switching to non-gluten items is pretty easy. It's such a common problem now that there are Gluten Free items available everywhere. There might even be a "Gluten Free" section of your grocery store.

I did have to run out and get some new items to bake this pie but they are items I'll use over and over in the future.

The Pie was wonderful.  The flavor was just what you'd expect with the added benefit of those chewy cranberries.  The crust was a little difficult to work with.  It crumbled easier then a normal crust so I needed up adding a little water and making sure it was really cold before trying to work with it. Make sure your rolling pin is well gluten-free floured up. After moving most of it to the pie plate I ended up just pressing pieces into the dish to make a complete pie crust.  It worked well in the end, just be aware that it's much more crumbly. The flavor is great however, similar to a regular pie crust but the texture is more on the crumbly side as I just mentioned. I used Gala apples but you can use whatever apples you want, just adjust the sugar based on how sweet the apple is.

Gluten Free Apple Cranberry Pie


Ingredients

Filling
  • 6 medium apples - peeled, cored and sliced
  • 3/4 to 1 cup granulated sugar
  • 1/2 cup dried cranberries
  • 2 Tbsp cornstarch
  • 2 tsp lemon juice
  • 1 Tbsp ground cinnamon
Crust
  • 2 cups Gluten Free all-purpose flour
  • 1/4 cup sweet rice flour
  • 1 Tbsp granulated sugar
  • 1 tsp xanthan gum
  • 1/2 tsp salt
  • 3/4 cup cold butter
  • 2 whole eggs
  • 1 1/2 Tbsp cider vinegar
Cooking Directions
  1. Make the dough first, so there's time to chill it. Add the first 6 ingredients to a bowl and use a pastry cutter to blend it until only small pieces of butter remain.
  2. Make a whole in the center and add the eggs and vinegar, mix together just until incorporated.
  3. Cut into two equal pieces and wrap in plastic wrap and refrigerate for 45 minutes.
  4. When the dough is chilled, start preheating the oven to 425º
  5. In a large bowl mix the filling ingredients and stir together so it's all coated.
  6. Roll out one of the crusts on a lightly floured surface and roll out to 1/4 thick and place in the pie dish. I found it easier to just press the dough into the dish since the dough can be crumbly.
  7. Add the apple filling on top of the dough and then top with the other piece of dough that has been rolled out.
  8. Cut the dough to allow for ventilation.
  9. Bake at 425º for 12 minutes and then reduce the heat to 350º and bake for 30-40 minutes. Check the apples to make sure they have softened.

July 13, 2016

Chia Chocolate Chip Cookies


My husband was at work one day, when his Captain pulled out a bag of little Chia Chocolate Chip Cookies and was telling my husband how wonderful they were.  They're healthy, gives him energy, curbs his appetite, and tastes delicious.  After my husband tried one, he called me to see if I could track down a recipe.  Which, of course, I could.  I mean, I practically live on Pinterest after all.

During the course of making these cookies I discovered how I didn't have all of the same ingredients the original recipe called for, so I substituted for what I did have. The important ingredient being Chia seeds, which I have plenty of.

Chia seeds are so very good for you.  They can puff up to more than double their size if left in a liquid, which means if you eat them as just a regular seed then they will fill you up, because of all that puffing up they do inside your stomach.  So, eat a cookie, wait, and soon you'll forget about being hungry.

You can make these to be dairy free (if you can find dairy free chocolate chips) or gluten free if you follow the original recipe.  Mine are neither, but they are delicious! I love the chewiness from the oatmeal and the slight coconut hint I got from the coconut oil.  Obviously the chocolate chips are obvious.  I'm loving this recipe.  Great flavor, and texture with the added bonus of filling you up when you're starving and getting all the added benefits of the oatmeal, chia seeds and coconut oil.  My husband will be taking these on his trips from now on.

Chia Chocolate Chip Cookies
Recipe modified from huffingtonpost


Dry Ingredients
  • 1 cup old fashioned oats
  • 1/2 cup brown pastry flour
  • 1/2 cup cake flour
  • 1/2 cup sugar
  • 1/4 cup chia seeds
  • 1 tsp baking powder
  • 1/2 tsp salt
Wet Ingredients
  • 1 whole egg
  • 1 tsp vanilla extract
  • 1/2 cup coconut oil
Cooking Directions
  1. Mix the dry ingredients together and the wet ingredients together and then mix them together.
  2. Refrigerate for 1 to 2 hours.
  3. Preheat the oven to 355º, lightly oil a baking sheet.
  4. Roll the dough into golf ball sized pieces and then flatten half way.
  5. Bake for 12 minutes. Check on them in the oven and if they aren't spreading you might have to help them by pushing down on them with a fork.
  6. Bake for another 2-3 minutes or until very lightly golden.
  7. Cool completely on a wire rack before moving to a plate or storage container.

June 29, 2016

Peach Blueberry Pie


It's peach season in the South so naturally we've been eating all we can.  I love to can peaches but haven't had time this year, so we've just been eating them fresh.  However, to change things up a bit I decided to try a pie.  Blueberries are my husbands favorite so when I saw this recipe I thought it was perfect.  Also, I had a handful of raspberries in my refrigerator so I threw those in too.

I loved the flavor of this pie.  Sweet and interesting because of the multiple fruit flavors.  The mixture is perfect and held up very well when sliced and served up. Perfect with some ice cream or whipped cream.

I just used a store bought crust which is not what I normally do, but it was still delicious.  If you make a homemade crust it'll be the hit of dessert!  I hope you can try this one this summer with some of your local peaches.

Peach Blueberry Pie
Recipe from Taste of Home


Ingredients
  • 1 cup sugar
  • 1/3 cup all-purpose flour
  • 1/2 tsp ground cinnamon
  • 1/8 tsp ground allspice
  • 3 cups peaches, sliced and peeled
  • 1 cup blueberries, fresh or frozen
  • pastry for double crust 9 inch pie
  • 1 Tbsp butter, at room temperature
  • 1 Tbsp milk
  • cinnamon sugar
Cooking Directions
  1. Preheat the oven to 400º
  2. Make the pie crust and put it in the pie plate (or use pre-made)
  3. In a large bowl, mix together the sugar, flour, cinnamon and allspice and whisk. Add the fruit and stir to coat.
  4. You can either top the pie with a full pie crust and cut to ventilate or create a lattice top.
  5. After you've added the top crust, cut off the excess crust around the edges leaving about 1/2 an inch overhand so you can tuck it under the bottom crust and seal with your fingers or a fork.
  6. Use a brush to spread milk over the top and then sprinkle with cinnamon sugar.
  7. Bake for 40-45 minutes, until golden. Let cool slightly before serving.

June 21, 2016

3-Minute Fudge


I'm one of those people who has trouble with fudge.  I mean, I've made it and half the time it turns out great and the other half of the time it's gritty.  So, I tend to be leary about even making it at all. When I saw this recipe and I thought I'd give it a try.

I've got to tell you, it was super easy, super fast and super delicious.  Win Win!

I have a neighbor who makes amazing fudge so I sort of judge all other fudges by her's.  This one is creamier than hers.  But of course, her's probably takes longer than 3 minutes too. The taste is super chocolatey, it's creamy and smooth.  I loved it.

If you're like me and need a quick dessert to thrill, this could be just the thing.

3-Minute Fudge
Recipe from Chocolate Chocolate and More


Ingredients
  • 1 can sweetened condensed milk
  • 1 bag semi-sweet chocolate chips
  • 1 tsp vanilla extract
Cooking Directions
  1. Spray a small square pan with cooking spray, 8x8 or smaller. Line with parchment paper and spray again for easy cutting.
  2. Mix the sweetened condensed milk and chocolate chips together in a medium sized microwave safe bowl.
  3. Heat for 1 minute in the microwave and then stir. It should be smooth at this point but if not microwave again in 30 second intervals until it is.
  4. Remove from the microwave and add the vanilla extract, stir and either refrigerate for leave on a counter top until set.

April 12, 2016

Orange Cream Frozen Yogurt


More Greek yogurt deliciousness.  This one is so good for the hot summer days that are quickly approaching.

This yogurt is so fresh tasting, yet creamy.  I loved how I felt guilty for eating it until I realized it's not that bad for me.  It's WAY better than the store bought alternatives.  The orange flavors are blended perfectly with the vanilla yogurt.  It's not too sweet, it's just perfect.

Very much like those orange creamsicle's we had as kids, only healthier.


Orange Cream Frozen Yogurt
Recipe from Food Network magazine


Ingredients
  • 3 cups plain Greek yogurt
  • 1/2 cup granulated sugar
  • 1/2 cup low fat milk
  • 2 Tbsp orange juice
  • 1 1/2 tsp orange zest
  • 1 tsp vanilla extract
Cooking Directions
  1. In a large bowl, whisk together all of the ingredients until smooth.
  2. Pour the mixture into your ice cream maker and process according to the manufacturers instructions until soft-serve texture is reached.
  3. Freeze

March 15, 2016

Greek Yogurt Fudge Pops


This past weekend I decided to try making my own Greek yogurt, and guess what? It worked.  It also made PLENTY of yogurt.  I've been searching for recipes where I can use some of it up (since I read that freezing yogurt changes the texture and makes it separate).

I'll post the recipe for the yogurt soon, but I wanted to share this one with you since my daughter totally loves it. It might help that I used these cute Popsicle molds, but she loves the flavor too. What a great way to use up some extra yogurt!

Creamy, not too sweet, with lots of chocolate flavor.  I think I'll make yogurt again soon just so I can make some more of these for summer. :)


Greek Yogurt Chocolate Fudge Pops
Recipe from Baker By Nature


Ingredients
  • 1 1/2 cups semi-sweet chocolate chips
  • 1 cup chocolate almond milk
  • 2 tsp vanilla extract
  • 1 1/2 cups vanilla Greek yogurt (full fat is best)
Cooking Directions
  1. In a medium saucepan, melt the chocolate chips over low heat until smooth and completely melted.
  2. Remove from the heat and whisk in the almond milk until smooth.
  3. Let sit for 5 minutes to cool slightly before adding the vanilla extract and Greek yogurt. Whisk until smooth.
  4. Strain the mixture through a fine mesh strainer.
  5. Pour the strained mixture into your Popsicle molds and freeze for several hours. 

March 2, 2016

Caramel Apple Pie Bombs


One of the things I love about apples is that they are abundant any time of the year (although not always locally grown) and I love apple desserts no matter what time of year.  They are the ultimate comfort dessert for me. 

I love apple pie, but it's not always the easiest thing in the world to eat without a fork, right? Hence, the apple pie bomb. The portable apple pie you can carry around unless you have issues with getting your hands full of caramel.  I guess you could skip that part and don't drizzle any over at the end.  That's an option of course. An insane option, but still. 

I loved the flavors you get with these sweet will bundles of deliciousness. The traditional apple pie flavors packed away in a soft, fluffy dinner roll.  I had some leftovers in the refrigerator for a couple of days and they were just as yummy after I warmed them for a few seconds in the microwave.  Such a good idea here. 

I hope you can find a reason to make some of these soon.  There are just a couple of steps involved but none of them are difficult or take that long.  Enjoy some apple pie bombs soon. 

Caramel Apple Pie Bombs
Recipe from Community Table


Ingredients
  • 12 frozen dinner rolls (frozen and uncooked)
  • 2 medium apples, I used granny smith but any kind should work
  • 1 Tbsp ground cinnamon
  • 2 Tbsp granulated sugar
  • 30 vanilla caramels, unwrapped and divided
  • 2 Tbsp unsalted butter, melted
  • 1/4 cup brown sugar
  • 2 Tbsp heavy cream
  • flour, for dusting
Cooking Directions
  1. Use a microwave safe dish to unthaw the dinner rolls without cooking them. I found that about 6 minutes on the "defrost" setting worked.
  2. Preheat the oven to 350º
  3. Use non-stick spray to spray a small oven safe dish (about 9x6) and set aside.
  4. Peel, core and petite dice the apples. Place them in a dish and cover them in the cinnamon and sugar mixture until fully coated. Reserve 1/4 cup of this mixture. 
  5. Unwrap 18 caramels and cut them into quarters, set aside.
  6. Lightly flour your work surface.
  7. Squish a piece of dough onto the floured work surface so it's not sticky and you can begin stretching it out to about a 3" circle.
  8. Take a Tbsp of apple mix and place it in the middle, then add 6 pieces of cut caramel pieces. Fold the dough ball around the filling and crimp the edges. Place in the prepared dish and finish the rest. You will have some leftover apple mixture and that's good.
  9. Once all the dough balls are in the dish, pour the remaining apple mixture over the top. Top with the brown sugar and bake for 30-35 minutes.
  10. During the last couple of minutes of cooking, put the rest of the caramel pieces in a microwave safe dish and add the heavy cream. Heat in 30 second intervals while stirring after each interval until smooth.
  11. When the rolls come out of the oven, drizzle with the melted caramel and serve hot.

February 10, 2016

White Chocolate, Cherry and Almond Biscotti


I can't believe that I have never made biscotti before.  I love it.  I buy it in the store but why haven't I ever made it? 

Well, I had to fix that. 

There are a lot of choices out there when you want to make biscotti.  Seems like just about every flavor imaginable.  I didn't really know which kind I wanted to make first, but I saw this one had cherries in it.  I didn't have dried cherries but I did have maraschino cherries, so I cut them up and dried them really well and they worked just fine. 

The crunchy not too sweet cookie, combined with the sweet white chocolate drizzle and the chewy cherries was a hit for me and my family.  Made crunchy so you can dip it in your coffee or tea. I loved this flavor and will be trying new flavors soon!

Also, this would be perfect for Valentines Day.  Just sayin. 

White Chocolate, Cherry and Almond Biscotti
Recipe from Gimme Some Oven


Ingredients
  • 2 2/3 cup all-purpose flour
  • 1 cup sugar
  • 2 tsp baking powder
  • 1/8 tsp salt
  • 1 Tbsp oil (I used canola)
  • 1 tsp almond extract
  • 1 tsp vanilla extract
  • 4 large eggs
  • 1/2 cup dried or maraschino cherries (cut in half and patted dry)
  • 1/3 cup white chocolate chips
  • 1/3 cup sliced or slivered almonds
  • white chocolate baking squares or chips for drizzling
Cooking Directions
  1. Preheat the oven to 350º
  2. In the bowl of your stand mixer, add the oil ,both extracts and the eggs. Mix to incorporate.
  3. In a separate bowl add the flour, sugar, baking powder and salt. Whisk together.
  4. Slowly add the dry ingredients into the wet ingredients and mix until combined.
  5. Remove the bowl from the mixer and use a spoon to mix in the cherries, chocolate chips and almonds.
  6. Lightly flour your work surface and put the dough on it, knead a couple of times to make it less tacky.
  7. Cut the dough in half and shape into two patties about 1" thick. Place them on a cookie sheet lined with parchment or a silicone baking mat and bake for 35 minutes.
  8. Remove the dough patties to a cooling rack and let them cool about 10 minutes.
  9. Decrease the temperature of the oven to 325º
  10. Once they patties have cooled a little, sliced them into 1/2" sliced and lay them back on the cookie sheet, cut side down.
  11. Bake for 10 minutes and then flip over and let them bake for 10 more minutes.
  12. Remove from the baking sheet and let cool on a cooling rack.
  13. Drizzle with white chocolate if desired.

January 14, 2016

Indian Pudding


While I was researching this recipe I was pretty shocked to find out that this is a New England dessert and nobody else will probably have any idea what you're talking about if you mention it.  Weird huh? I'm not from New England and yet I've heard of it.  I've never tried it but I know of the name.  My husband is from New England and he's never tried it either. Fascinating isn't it? Okay maybe just to me. 

Here's the history as I've come to find out. This dessert has always been a staple at Thanksgiving through much of the 20th century in New England. Historians have traced it back to as early as the 17th century. It probably defended from England's hasty pudding. This pudding uses cornmeal which was more abundant to the early settlers than wheat was. Molasses was also readily available and inexpensive during that time due to the production of rum during the 17 and 18th centuries. This pudding is also baked for a long time at a relatively low temperature which would have been conducive to the hearth that was in every home in New England to heat the house. 

The taste is very "fall like".  By that, I mean the molasses and cinnamon and ginger are prevalent flavors.  The texture is custard like. It's extremely moist, with small little grains from the corn meal.  It's very tender and ice cream is perfect when served with it.  My husband really enjoyed it, he's the custard lover in the family.  I wouldn't describe this as "creamy" but it's not chunky or anything either.  Have you ever soaked cornbread in milk? Its sort of like that....I thought that flavors were wonderful and I can see why it's a holiday favorite. 

Indian Pudding
Recipe from Cape Cod Cookbook


Ingredients
  • 5 Tbsp cornmeal
  • 1 quart (4 cups) milk
  • 2 Tbsp butter
  • 3/4 cup molasses
  • 1 tsp salt
  • 3/4 tsp ground cinnamon
  • 1/2 tsp ground ginger
  • 2 whole eggs, beaten separately
  • 1 cup evaporated milk
Cooking Directions
  1. In a large saucepan, combine the cornmeal and milk and whisk together so there are no lumps.
  2. Heat over medium heat until the mixture has scalded (look for tiny bubbles along the edge of the pan).
  3. Add the butter, molasses and seasonings and whisk until smooth.
  4. Pour a tiny bit of the liquid in with the beaten eggs and whisk, add more of the liquid and whisk some more. After the eggs have heated you can pour them into the liquid mixture in the saucepan. Whisk until smooth.
  5. Pour the mixture into a well greased casserole pan.
  6. Add the evaporated milk to the top but do not mix together.
  7. Bake at 350º for 1 hour.