August 31, 2012

Crab Rangoon Dip


I thought for sure that everyone had experienced a Crab Rangoon at some time in their lives but I was shocked to learn that some people didn't have any idea what I was talking about.  For those of you who are in that group of people who don't know what the heck I'm talking about here is a little run down.  Crab Rangoon's can be found at most quick Chinese restaurants and they are usually made of a won ton that is filled with a cream cheese/crab mixture and then fried.  They are delicious. They are not very healthy but when you're out eating Chinese food, healthy choices are sometimes hard to find.

I discovered this recipe on Pinterest of course.  I was looking for a quick recipe that I could make on limited time.  I'm so glad I found this one.  It really does taste like the filling you would find inside of a Rangoon.  The website I found it on indicated that it's best served with fried won ton strips but obviously those would be hard to find and hard to "quickly" make so I just served it with tortilla chips.  It must have been a hit at the party I brought it too because after only about 3 hours it was all gone.

I'll happily keep this in my arsenal for quick dips!


Crab Rangoon Dip
Found at Reckless Abandon


Ingredients
  • 2 cans crab meat
  • 2 (8 oz) blocks of cream cheese
  • 1/2 cup sour cream
  • 4 green onions, chopped
  • 1 1/2 tsp Worcestershire sauce
  • 2 Tbsp powdered sugar
  • 1/2 tsp garlic powder
  • 1/2 tsp lemon juice
Cooking Directions
  1. Pre-heat your oven to 350 degrees.
  2. Soften the cream cheese either by leaving out on your counter for several hours or by microwaving for 1 minute or so.
  3. Chop your green onions and add them and the drained crab meat to the cream cheese mixture.
  4. Add all of the remaining ingredients and mix well.
  5. Transfer the mixture to a oven proof dish and cook for about 30 minutes.

August 29, 2012

Mocha Ice Cream


I love how cool those people look when they walk around with their Starbucks cups.  I wish I were one of them.  Sometimes I go to Starbucks and get a coffee free frozen drink or a hot cocoa and I cherish the opportunity I have to strut myself around with a coffee cup. 

I wish I liked coffee. 

Here's the funny thing about me and coffee.  On the rare occasions that I have drunk coffee my personality changes and I turn into a real cranky pants.  Yes, cranky pants is the nicest way I could think to put the personality I am transformed into with coffee.  I don't know why.  It's weird. It's a caffeine thing I guess. 

Here's another funny thing.  I love the way coffee smells.  I love having my Hazelnut scented wax melting in my house.  It makes me happy. 

OK, there's the last funny thing.  I love slightly coffee flavored ice cream.  Like this Mocha ice cream.  I love everything about it.  It's a good thing too because this recipe makes a lot of ice cream! Not sure if you know this or not but coffee does tend to bring out chocolate flavors even more.  Often times you'll see brownie recipes with some coffee added.  Usually you can't really taste the coffee but you can in this ice cream.  It's not a strong flavor but it mixes perfectly with the chocolate flavors.  I love it! My husband loves it! My daughter loves it! Winner!


 Enjoy!

Mocha Ice Cream
Recipe from Taste of Home


Ingredients
  • 2 1/4 cup sugar
  • 3/4 cup baking cocoa
  • 1/3 cup all-purpose flour
  • 1 Tbsp instant coffee granules
  • dash salt
  • 3 cups milk
  • 4 eggs, beaten
  • 2 cups heavy whipping cream
  • 3 Tbsp vanilla extract
  • 4 cups half and half
Cooking Directions
  1. In a large heavy bottomed saucepan, combine the sugar, cocoa, flour, coffee and salt. Add the milk and eggs gradually and stir until smooth.
  2. Cook and stir over medium heat until the mixture thickens enough to coat the back of a metal spoon. Mixture should be about 160 degrees and should take about 15 minutes. Refrigerate until chilled.
  3. Stir in the remaining ingredients. 
  4. Fill your ice cream maker 3/4 full and freeze according to the manufacturers instructions. Refrigerate any remaining mixture until you're ready to freeze.
  5. Freeze until 10 minutes before you're ready to serve.

August 27, 2012

Zucchini Casserole


OK I can officially say that I feel Fall in the air now.  I was able to leave my windows open until 2 pm yesterday before shutting them all and turning on the A/C.  This makes me very happy.  Fall is my absolute favorite time of the year.

I can't wait for apples to be ready to pick and to come up with some new ideas and recipes for those.  If you have any good ones let me know.

Now on to this zucchini casserole that has been in the Jennings family for who knows how long.  I can tell you this much.  When I was given the recipe to copy down it still had some of the "old time" measurements.  For instance, did you know that Campbell's soup used to come in a larger can? Did you know that Stove Top stuffing came in a different sized box also?  I had no idea but when I mentioned it to my dad he knew all about it.  Go figure.

Anyway, this recipe is awesome.  I can see why it's a family favorite.

Thank you for the recipe Lenny!

Zucchini Casserole

Ingredients

  • 6 cups zucchini or summer squash, diced
  • 1 cup onion, diced
  • 1 can cream of chicken soup
  • 1 cup sour cream
  • 1/2 cup margarine, melted
  • 1 package (6 oz) herb flavored stuffing mix

Cooking Directions

  1. Preheat the oven to 350 degrees.
  2. Boil the squash and onion until tender and drain.
  3. Add the soup cream and cream of chicken soup to the squash and onion and mix well.
  4. Mix the melted margarine with the bread crumbs.
  5. To assemble layer 1/2 the squash and 1/2 the stuffing mix in an 9x13 inch dish. Repeat with the second layer. If you started your assembly with the squash, make sure to hold some of the bread crumbs for the topping before baking.
  6. Bake for 20 minutes or until the bread crumbs begin to get golden and crispy.
  7. You can add chicken if you'd like. Use 1 cup of chopped cooked chicken meat and mix it in when you add the soup and sour cream.

August 22, 2012

Tuscan-Style Cauliflower


I'm not gonna lie.  Cauliflower in this house usually just goes bad in my refrigerator.  I happen to love it raw but my husband isn't a fan of it in any form.  He is however part Italian so I decided to appeal to his heritage and try this recipe.  

We were both pleasantly surprised with this one. The tomato adds enough flavor that you don't feel like you're eating a big plate of cauliflower, even though that's exactly what you're doing. I topped ours with Parmesan cheese which added another element of flavor that we really enjoyed. 


This dish is very easy to prepare.  Chop the cauliflower head in advance.


Start with the garlic, add the tomatoes and then the cauliflower.


Let the mixture simmer for a while and presto, a healthy side dish.  I'm not going to say that I've reformed my husband into loving cauliflower but he eats this with no complaints so I count it as a victory!

Thanks Mario Batali!

Tuscan-Style Cauliflower
Everyday with Rachel Ray, September 2007, page 127 

1/2 cup extra-virgin olive oil
1 clove garlic, crushed
2 pounds tomatoes - peeled, seeded and chopped, or 4 cups canned tomatoes, drained and chopped.
1 head cauliflower, broken into 1-inch florets
1/2 cup boiling water
Salt and pepper
1/2 cup finely chopped flat-leaf parsley

In a large skillet, heat the oil over medium heat.  Add the crushed garlic and cook until soft and golden and then add the tomatoes.  Cook until they break down.

Stir in the cauliflower and boiling water and cook for about 30 minutes.

Add the salt and pepper to taste and the parsley.


August 20, 2012

Frosted Ginger Cookies


 I know it seems like I make a lot of cookies doesn't it? Well, I do.  But you should know that I end up giving away most of them.  I keep a couple for my kiddo and pass the rest along.  People love me (or hate me).

This particular batch of cookies was chosen by my daughter out of a Taste of Home Cookie book I have.  I was sort of surprised she chose this one since it didn't have any chocolate in it which is usually her thing.  I loved this cookie.  It's not what I would call chewy but definitely soft. More caky then chewy.

I loved the spicy taste that you get from the ginger, cinnamon and cloves.  We made this a little premature of fall but I would love to bring this to a fall event.  The frosting was pretty amazing too.  If you plan to frost all of the cookies I would double the frosting recipe below, otherwise you only get enough for about half of the cookies.


Definitely a keeper in my recipe book.  Enjoy!

Frosted Ginger Cookies
From "Taste of Home Cookies and More" Jan. 2012 page 13 by Jeanne Matteson

1 1/2 cups butter, softened
1 cup sugar
1 cup packed brown sugar
2 eggs
1/2 cup molasses
2 tsp vanilla extract
4 1/2 cups all-purpose flour
1 Tbsp ground ginger
2 tsp baking soda
2 tsp ground cinnamon
1/2 tsp salt
1/2 tsp ground cloves

Frosting

1/3 cup packed brown sugar
1/4 cup milk
2 Tbsp butter
2 cups confectioners sugar
1/2 tsp vanilla extract

Preheat the oven to 325 degrees.  Line cookies sheets with parchment paper or another non-stick covering.

In the bowl of your stand mixer, add the butter and sugars and cream together.  Add the eggs on at at time mixing well after each addition.  Stir in the molasses and vanilla and mix well.

In a separate bowl combine the dry ingredients and gradually add them to the creamed mixture.

Use a medium cookie scoop or tablespoon to drop the mixture onto the prepared cookie sheets.  Bake for 12-15 minutes until cookies spring back when touched.  Do not over bake.

For the frosting: In a large saucepan, bring the brown sugar, milk and butter to a boil.  Cook and stir the mixture for 1 minute.  Remove from the heat (mixture will look a curdled at first).  Cool for 3 minutes.  Add the confectioners sugar, vanilla and salt.  Mix well.  Frost warm cookies .

August 17, 2012

Kristi's Dip


Just ask any of my friends about this dip and they'll all start gushing about it.  My friend Kristi made it up and it was appropriately named after her.  We all love it and you can almost guarantee that if someone in our circle of friends is having a get together someone will bring this dip.

I usually just find a chair nearest to this dip and then use some sports blocking techniques to block off others.  It's sort of how I work out these days.

I can't believe I've had this recipe in my draft folder for so long.  Well, today is your lucky day.  Right before the weekend and right before many of you are sending your kids off to school.  Surely you have a function to go to this weekend that you can give this a try.

You won't be sorry.  Seriously. Try it.  Right now.


Kristi's Dip
From my friend Kristi W.

1 lb. ground beef
2 (8 ounce) blocks cream cheese (softened)
1 pkg. taco seasoning mix
1 jar Pace picante sauce (or other thick & chunky salsa)
2 cups shredded Mexican cheese

Brown ground beef and drain. Mix ground beef, cream cheese and taco seasoning mix and spread it into a baking dish. Layer the salsa next, then top with the shredded cheese. Bake at 350 until the cheese melts. Serve with tortilla chips.


August 16, 2012

Mozzarella-Stuffed Meatballs


I've already started daydreaming about fall.  Are you with me or are you all dreading summer's end? I need some cool air in my life again.  I need sweats and sweatshirts (yeah I really class it up).

I'm trying to push summer out by making fall recipes but it's not working.  It just makes my kitchen hot.

As I'm sure you've guessed by now I'm a cheese lover.  All cheeses, I don't discriminate.  We decided to make these meatballs filled with mozzarella cheese but I think you're favorite cheese would work great in here.  I think next time I'll use a sharper tasting cheese, maybe even blue cheese.  You really can't go wrong here.


Start by making your meat mixture.  As a side note, if you're watching your carbs you can replace bread crumbs with crushed up pork rinds and it works just fine.


Flatten out a piece of ground meat in your hand and fill with the cheese. 


The key here is to close the meat completely around the cheese.  It might still melt out a little but that's OK.


Brown the meatballs on all sides until they are golden brown.


Serve with your favorite marinara sauce.  Obviously if you're not watching your carbs this would be delish over some pasta also.

If you try this with some different cheeses let me know which one's you use!

Mozzarella-Stuffed Meatballs
Modified from "Taste of Home Contest Winning Recipes 2011" page 111

1 egg, lightly beaten
1 1/2 cup crushed pork rinds
1/4 cup prepared Italian Salad Dressing
2 Tbsp minced fresh parsley
2 garlic cloves,  minced
1/2 tsp dried oregano
1/2 tsp pepper
1/4 tsp salt
1 pound ground turkey
1/4 pound ground beef
3 ounces fresh mozzarella cheese
2 Tbsp canola oil
1 jar marinara sauce

Mix all of the ingredients EXCEPT the oil, cheese and marinara sauce.  Dice up the cheese and set aside.  Heat the oil in a large fry pan over medium heat.

Start by making a small round flat patty in your hand.  Place a cube of cheese in the middle and wrap the sides up over the cheese and then form the meat into a ball around the cheese.  Place them aside until you have enough to put in the fry pan without over crowding.  Make sure to turn the meat regularly so that all sides get golden brown.

Repeat with any remaining meatballs.

Serve with Marinara sauce.

August 13, 2012

Creamy Tomato & Herb Dressing


I know it's almost fall (or it is in my mind at least) but we're still focusing on eating healthier this year.  I don't know about you but I could really use a year long head start on next years beach body.  

If you're looking for a new way to dress up the boring salads that seem to make their way to you dinner table then try some new dressings.  The great thing about making your own dressings is that you know what exactly is in it and you can modify the flavors to match your tastes.  You can also only make a little at first so if you end up not caring for it you haven't committed to a huge bottle of it.  I don't think you'll have that problem with this dressing.  If you like tomatoes then you'll probably like this dressing. 


I made my own garlic oil by heating the oil in a pan and dropping a couple cloves of garlic to get slightly brown.  Let cool.


Add the ingredients into a food processor or a blender. Refrigerate.

Doesn't it look pretty? It tastes pretty darn good too.  This dressing is a nice change up from some of the  more common dressings like Ranch or Italian.

It definitely has a tomato base flavor. The herbs and vinegar make the dressing very flavorful and the mayonnaise makes it creamy.  Don't worry if you're not a mayonnaise fan because you can't taste it.  If you're still not convinced I'm sure you could substitute Greek yogurt.

Creamy Tomato and Herb Dressing
Modified slightly from "Down Home Cooking Pure Wesson"cookbook page 39

1 can (14.5 ounce) whole tomatoes, unsalted if possible (Original recipe calls for diced with garlic)
1/4 cup cider vinegar
1/4 cup mayonnaise
1 Tbsp dried parsley (original calls for 1/4 cup fresh, chopped)
(original recipe has 2 Tbsp spicy brown mustard) I didn't have any.
1 tsp sugar
2 large cloves of garlic.  I cooked mine in the oil on low heat until golden and then let it cool down before adding it to the dressing. (original calls for 1 tsp fresh minced)
1/2 cup vegetable oil
Salt and Pepper to taste

If you're using tomatoes that do not have garlic in them just do what I did.  Heat the 1/2 cup of oil in a fry pan and drop in 2 large cloves of garlic and let brown over low heat.  Let cool to room temperature.

In a food processor or a blender, add all the ingredient except the oil/garlic and salt and pepper.  Use the  pulse mode to slowly incorporate the ingredients.  Slowly pour in the oil/garlic while blending and then salt and pepper to taste.

Refrigerate for an hour or up to 24 hours.  Shake before serving.

August 10, 2012

Mini Pies


I've been having such a good time since my new found freedom (not working) and getting to spend quality time with my little girl.  We've been going to beaches and visiting family, parks, pools, play dates, you get the drift.  I think my posture is beginning to improve now that I'm not hunched over in front of a computer for 8 hours a day.  In case you're wondering, I'm standing as I type this. :) 

The only downfall I've seen so far is my addiction to Pinterest.  It's a serious problem.  Especially since Pinterest is just known for being a time killer.  Sometimes I jump on real quick before heading to bed and notice an hour has flown by and I'm still pinning.  

That brings me to this dessert.  I found the idea on Pinterest and knew I wanted to make it using the pie filling I posted about recently. I didn't really follow the recipe that was on Pinterest since I figured it was pretty much like making a regular pie only on a much smaller scale.  


The pie crust I used is one I've been using for a year or so because it makes enough for 3 crusts and it's freezable.  You can find the recipe here


 Anyhoo, make sure to spray each cupcake tin thoroughly so these little babies will come out when time.


The cherry pie filling recipe can be found here; but any canned variety or your own favorite recipes would work too.

In case you haven't noticed, this is more of a method then a recipe.  Cutting all those little dough strands for the lattice top was a pain but you could also just cut some fun shapes with some cookie cutters and save yourself some heartache.

Just as you would with a regular pie, coat the tops with some egg and water so it turns a nice golden brown color.  Sprinkle with sugar too for a nice added sweet crunch.

Bake at 350 degrees for about 12 minutes or until the crust is golden brown.  Let the pies cool in the pan until you can handle them easily.  You will probably need to run a knife around the edges of the pies in order to get them out.

I didn't try to freeze any of these but I'm sure you could.  They would make a perfect little treat after dinner or for unexpected guests.

August 8, 2012

Mixed Bean Soup


I know that this is a strange time to be posting about homemade soup, I mean it is like 100 degrees outside.  I don't have a very good reason other than I had a bag of mixed dried beans that I wanted to use.  I did a quick Internet search and found this soup idea that I ended up modifying slightly.

My husband actually really liked this and I did as well.  I'm a big fan of beans but he doesn't always like them especially in soup.  We had this soup devoured in no time.

Even if you don't want to break out this soup recipe until fall, definitely keep it in the back of your mind for when the weather cools down. There's nothing like homemade soup in my opinion.  Not only is it delish but you can also feel good about knowing whats in it and watching people enjoy it.


I actually looked forward to eating the leftovers which for me means it was a success.  :)

Mixed Bean Soup
Modified slightly from TasteofHome

1 - 12 ounce package mixed dried beans
4 - 5 cups water (depending on how much liquid you like).
1/2 pound ground beef, cooked and crumbled.
1 can tomatoes - diced, undrained
1 cup chopped celery
2 cloves garlic, minced
1 small onion, diced
1 Tbsp salt
1 tsp dried parsley
1 tsp dried thyme
2 bay leaves
pepper to taste

Soak beans overnight and then drain.  Place the beans in a 5 quart crock pot and cover with water.  Cook on high for an hour until beans are cooked.  Drain and put the beans back in the crock pot.  Add 4 cups of water and all of the other ingredients.  Cook on low for 4 hours.


August 6, 2012

Savannah and the Dinosaurs!

Over the weekend my daughter and I took a drive to Savannah for a quick overnight trip to see a dinosaur exhibit they had going on there.  She loves dinosaurs and I love Savannah so it seemed like the perfect chance to getaway.

It's only a four hour drive for us to get to Savannah so it wasn't bad at all.

Our first stop for the evening was the beach at Tybee Island.  This was our first time to Tybee Island and we fell in love with it. We will be coming here more often for sure.  The water was so warm it was like bath water, the beach was nice and sandy and the town is not as commercialized as some of the other area's nearby.


That's my little one heading back to the car.


We needed to go into historic Savannah to catch the ferry to the Convention Center which is where the Dinosaur exhibit was.  Twist my arm, historic Savannah is one of my favorite places ever.


My little girl watching the water on our ferry ride.


The dinosaur exhibit was fun, there were mechanical dinosaurs as well as these statues.


You could even act like a paleontologist and dig for dinosaur fossils.


Yes, we did stop at the candy store.  Yes this is what I got.  They called it a bear claw but they should have called it a diet wrecker. It was fresh made caramel poured over almonds and then topped with milk chocolate.  They had a cashew variety too that looked equally as sinful. Had to of been at least a thousand calories but it was oh so good.


A look down the street at the old buildings.  If you've never been to Savannah you have to put it on your do to list!


August 3, 2012

Black and White Peanut Butter Brownies


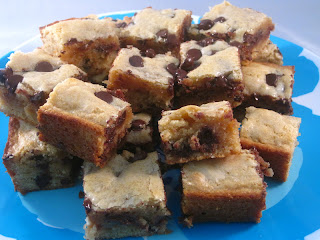
What do make when you're asked to make a dessert but you know that one person who will be eating that dessert doesn't like chocolate?

Let's get sidetracked for a moment.  Doesn't like chocolate? Really? I can't even relate. I know a couple of people who don't like cheese and I honestly don't even know what to do with that.

Anyway, back on track.  I usually make a lot of lemon flavored desserts when I know she'll be there but this time I decided to take a risk and make a dessert that just had little pieces of chocolate in it.  I figured she could pick them out if nothing else.


Are you wondering what the non-chocolate lover said about these brownies? She loved them. :) She said she likes chocolate in small doses so this was perfect.  Yay!

The peanut butter and chocolate combination is a favorite of course and I loved how chewy and flavorful these brownies are.  I'm really glad I made them to bring to someone else's house so I wasn't tempted to eat them all myself. I will make sure I have white chocolate on hand in case I have the urge to make these again soon, which I think I will.


Black and White Peanut Butter Brownies
Found at Tracey's Culinary Adventures

4 tablespoons unsalted butter
6 oz white chocolate, finely chopped
3/4 cup (5 1/4 oz) granulated sugar
2 teaspoons vanilla extract
1/2 teaspoon salt
2 large eggs, at room temperature
1/4 cup creamy peanut butter
1 1/4 cups (5 1/4 oz) King Arthur Unbleached All-Purpose Flour
1/2 teaspoon baking powder
3/4 cup bittersweet or semisweet chocolate chips


Preheat the oven to 350 degrees. Line a 9x9 inch pan with tin foil so you can easily lift the brownies out of the pan after they are baked.  Spray the tin foil with non-stick spray. 


In a heat proof bowl over a pan of simmering water, melt the butter.  When the butter is melted, remove the bowl from the pan and dump in the finely chopped white chocolate.  Whisk the white chocolate in with the butter until smooth, do not put the bowl back on top of the saucepan with the hot water or your chocolate will separate from the butter.  When the mixture is smooth, add the sugar, vanilla extract and salt.  Let cool to room temperature.  


Add both eggs and the peanut butter to the room temperature white chocolate/peanut butter mixture and mix until smooth. Add the flour and baking powder and mix well.  Use a spatula to mix in 1/2 cup of the chocolate chips. 


Pour the mixture into the prepared pan and use your spatula to make the top nice and even.  Sprinkle on the remaining 1/4 cup of chocolate chips. 


Bake for about 25 minutes.  The edges will be golden brown and the sides will start to pull away from the pan a little.  Move to a cooling rack and let sit until cool.  When cool, lift the sides of the tin foil and remove the brownies from the pan.  Cut and serve. 

August 1, 2012

Philly Cheesesteak Stuffed Peppers


Low carb is the theme in this house lately.  I found a great blog that has a bunch of low carb recipes and I'm loving it.  Great ideas!  It's hard for me to eat the same things over and over so variety is exactly what I need. I'm not doing the low carb thing as hard as my husband is but I'm trying to be better about my carb intake.  

The fact that I don't consider cake and brownies a carb might be a problem. Just kidding, sort of. 

Anyway, I can't do ALL carb free in this house since my little girl will pretty much ONLY eat pasta of some kind.  We're working on her too. 


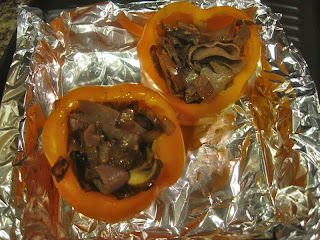
Saute some mushrooms and onions.


Cut the tops of the bell peppers and take out the seeds and membranes.  Chop the steak into bite sized pieces.


When the mushrooms and onions have caramelized add the meat and cook until warmed through.


Line the bell peppers with a piece of provolone cheese.


Fill each pepper with the meat mixture.


Top each pepper with another piece of provolone cheese.


Bake until the cheese is nicely melted and golden brown.


My husband and I really enjoyed these stuffed peppers.  Next time I might add some cheese to the meat mixture as well so it's gooier.  I'm all about gooey.  I'll be adding these peppers to my dinner rotation.

Wait, I don't have a dinner rotation.

Whatever.

Philly Cheesesteak Stuffed Peppers
Recipe modified only in serving size peaceloveandlowcarb

2 orange bell peppers
1/2 small onion
1 medium to small clove of garlic, minced
4 porcine mushrooms, sliced (you could use button mushrooms too).
1 Tbsp Olive Oil
1 Tbsp butter
Salt and Pepper to taste

Preheat the oven to 400 degrees. Line a cookie sheet with tin foil.

Begin by melting the butter and olive oil together in a large frying pan.  Add the onion and mushrooms and cook on low until caramelized.

Add the chopped meat and cook until warm.  While that is warming, cut the bell peppers.  I cut the tops off mine but the original recipe says to cut in half length wise.  I'm sure it doesn't matter how you cut it. Remove the seeds and membranes.

Put a slice of Provolone cheese in each pepper.  Fill the pepper with the meat mixture and then top the peppers with another slice of provolone.  Bake for 15 to 20 minutes or until the cheese is melted and golden brown.