January 24, 2013

Homemade Chocolate Sauce


Sorry for the lack of posting, my daughter and I just spent a week visiting family and friends in Montana.  We got home very late last night, well very early this morning actually.  Either way I'm very tired.  I promise to post some pictures of our vacation soon.

I made this chocolate sauce just before Christmas and we LOVED it! Full of chocolate and simple to make.  Great to make chocolate milk or as a topping.


I love this sauce because you probably have all the ingredients in your house to make this right now and you will not regret having it.  We started to look for reasons or ways to use it.

Put this on your "must try" list!


Homemade Chocolate Sauce
Recipe from Mel's Kitchen Cafe


Ingredients
  • 3/4 cup light brown sugar
  • 3/4 cup granulated sugar
  • 1 cup unsweetened cocoa powder
  • pinch of salt
  • 1 cup cold water
  • 1 Tbsp vanilla extract
Cooking Directions
  1. Mix the sugars, salt and cocoa powder in a large sauce pan until combined and smooth.
  2. Add the water and whisk until smooth and no lumps remain.
  3. Heat the mixture on medium high heat to a boil, then reduce to medium low for about 5 minutes.
  4. Remove from the heat and add the vanilla extract and incorporate well.
  5. Pour the mixture into a heat proof jar and let cool to room temperature.
  6. Refrigerate in an air tight container.
  7. To make chocolate milk, add about 2 Tbsp of the chocolate sauce to an 8 oz glass of milk and mix well. Add more if needed.

January 14, 2013

Farro and Roasted Butternut Squash


This is the first time I've ever tried Farro but it won't be the last.  I loved it.  I like Quinoa too but I like this even better.  The texture is much better for me, chewy but soft at the same time and the flavor is nutty but not overpowering so you can pretty much flavor it up a ton of different ways.

If you're wondering what Farro is, let me explain, It is one of the oldest grains to ever be cultivated by humans.  Originally found in the Middle East and is now mostly grown in Italy.  Apparently it's a wonderful breakfast dish also when served with maple syrup or honey and fruit.  I will be trying that for sure!  I plan to make sure this is added to my regular grocery list.


Cooking the Farro in chicken or vegetable stock will just give another layer of flavor.


While your Farro is cooking, roast the vegetables that have been coated in oil, balsamic vinegar, thyme and salt.  Turn every so often so all sides get golden. 


After the veggies are cooked and the farro is tender mix them together and top with goat cheese if you'd like.

I loved how chewy the farro is and the balsamic vinegar is just a slight background taste and doesn't overpower the rest of the flavors at all.

Farro and Roasted Butternut Squash
Nature's Earthly Choice


Ingredients
  • 1 - 12 oz package (2 cups) pearled Farro
  • 2 tsp fine grained sea salt
  • 5 cups water or stock (I used chicken stock)
  • 3 cups butternut squash, cut in 1/2" dices
  • 1 large red onion, cut in 8 pieces (I used yellow)
  • 1 Tbsp fresh thyme (I used 1 tsp dried)
  • 3 Tbsp olive oil
  • 1 Tbsp balsamic vinegar
  • 1 cup walnuts, deeply toasted (I omitted these)
  • 3 Tbsp walnut or olive oil
  • 1/4 cup goat cheese (optional)
Cooking Directions
  1. Preheat the oven to 350 degrees
  2. In a large saucepan, combine the faro, salt and stock or water. Cook over medium heat, then cover and simmer, stirring occasionally for about 15-20 minutes until the farro is tender.
  3. Remove from the heat and drain any remaining liquid.
  4. While the farro is cooking, toss the squash, onion and thyme with the olive oil, balsamic vinegar and a couple of big pinches of salt.
  5. Line a jelly roll pan with tin foil and put the squash mixture onto the pan in an even layer.
  6. Cook for about 20 minutes, turning the veggies about every 7 minutes so that all the veggies brown evenly.
  7. Remove from the oven and let cool slightly.
  8. Mince about half of the onions.
  9. In a large bowl gently toss the veggies and the faro with the walnut oil or the olive oil. Taste and add salt if needed.
  10. Garnish with goat cheese crumbles.

January 11, 2013

Baked Buffalo Wings


My husband is a huge wing guy, actually so are most men I believe.  The one thing he's very particular about is the crispiness factor.  Soggy wings are a big no no in this house but crispy wings are hard to achieve without a deep fryer and I dislike frying.  I'll do it, don't get me wrong but I'd rather not.  It's not even the health concern that gets me, it's the yucky smell in my house for two days after that I don't like.

I think I went on a tangent there.  Sorry.

Anyway, my husbands love for wings.  So one day I was at the grocery store and it was just about lunch time so I was looking around for something to make.  I suddenly got a hankering for wings.  I hadn't had them in a long time and it was time to whip some up.

When I got home I did my usual perusal of the Internet and stumbled upon this recipe.  I specifically typed in "baked" so that I would not need to fry.  Anyway, this one had good ratings so I figured I'd give it a try.  I'm so glad I did.  My husband proclaimed these as some of the best he's had and here's the kicker, they aren't even super crispy.  I mean they are and they aren't.  They are super flaky but not crispy like you would get with a fryer.  But the underlying flavor of the hot sauce and the combination of that with the flaky skin puts these over the top for us.  Definitely a keeper.


I wasn't sure if dipping these in the hot sauce mixture after they had been coated in flour was going to work but it was a winner.


Baked Buffalo Wings
Recipe from Allrecipes.com


Ingredients
  • 3/4 cup all-purpose flour
  • 1/2 tsp cayenne pepper
  • 1/2 tsp garlic powder
  • 1/2 tsp salt
  • 1/2 cup butter, melted
  • 1/2 cup hot pepper sauce (I used Franks)
  • 20 chicken wings
Cooking Directions
  1. Line a rimmed cookie sheet with tin foil.
  2. Put the flour, cayenne, garlic powder and salt into a large zip closure bag.
  3. Drop the wings into the bag with the flour mixture and shake to coat.
  4. Put the coated wings on the prepared pan and refrigerate for 1 hour. (I didn't do this).
  5. Preheat the oven to 400 degrees.
  6. Mix the melted butter and hot sauce together in a bowl, dip the flour coated wings in the sauce and then place the wings back on the cookie sheet. 
  7. Bake the wings for about 45 minutes, turning once halfway through cooking until they are no longer pink inside.

January 9, 2013

Ruler Measuring Board


Thank you Pinterest for another great idea!  I'm sure many of you have seen it as well and I thought it was such a cute idea.  

The original post I saw for this measuring board didn't give specifics about what size wood to by or any of the other supplies I'd need so I just winged it.  I made a couple of mistakes and I'll show you those too.  I'm honest like that. 

I had the project completed in less than a full day and only two trips to the hobby store.  I hope to save you some time by giving you the nitty gritty right away. 


The wood we chose to use was 3/4 inch thick, 6 feet long and about 7 1/3 inch wide.  I think you can choose any wood you like.  This piece is oak and didn't need to be stained because we didn't want that funky smell in the house and because I'm to impatient to wait for stain to dry.


We have molding on the bottom of the wall we wanted to hang this measuring board on so we measured up above the molding and started our "ruler" 9 inches off the ground.  So the bottom of the board is the 9" mark.  Does that make sense?


I used a pencil to mark the inch marks all the way to the top of the board.  I then used my husbands right angle tool and a sharpie marker (just a regular permanent marker) to draw 2 - short 1" wide marks and then a 2" wide mark.  So it would go in a pattern like this.

_____ (1 inch)

_____ (1 inch)

__________ (2 inches)

_____ (1 inch)

_____ (1 inch)

__________ (2 inches)

Get it?


These are the finished marks.


At first I used a black sharpie marker to do the 1.  But the black ink sort of bled and I didn't like that.


Then I used a black acrylic paint to do the number 2 and it was awful.  The paint sort of bled under the stencil and it looked awful.  We quickly wiped off as much of the paint as we could using some paint thinner to help get it off.  Most of it did come off but there was a slight discoloration where the number was.


Next I used a pencil to draw the rest of the stenciled numbers.


Then I ran to the hobby store again and bought this Sharpie Paint pen.  Best invention ever!  It was easy to do the remaining numbers with this thing.


My daughter took this picture of me painting on the rest of the numbers.  Pretty good picture for a 4 year old if I do say so myself.


This is the finished project.  Looks just like a ruler!  You can hardly tell where I messed up on the number 2!

This picture shows the molding we have on the bottom of the wall we wanted to hang this on, we measured up from the floor 1 foot and marked it on the wall, then matched up that indicator with the 1' mark on the ruler.

To hang it, my husband drilled a couple of holes under the 6 and a couple more near the 1 and just drilled it into the wall. Easy.  I'm sure there are ways to do it that won't leave marks on the front side but honestly you can barely even see them. So we didn't care.

Here is what you'll need:


  • 6 foot long piece of wood.  You might need to stain it to match your decor. 
  • Package of 2" stencils, you'll find the numbers with the alphabet stencils (all in the same package) but check the back of the package to make sure there are numbers in there. If you buy a piece of wood that is wider then the one I used you might want to get 3" stencils. 
  • 1 black Sharpie Paint pen. 
  • Ruler or yard stick
  • Right angle tool (square) like I showed above
Total cost: $33.00  (25.00-Oak Board, 6.00 Stencils, 2.00 Sharpie Paint Pen)

January 7, 2013

Herb and Garlic Roasted Leg of Lamb


I can't believe that in all my years of cooking I've never attempted to make a leg of lamb.  I mean, I've eaten lamb and I love it but for some reason I thought it would be really complicated.  Turns out it's just another roast, easy.

Lamb can be a little pricey which is probably why it's reserved for holiday's most of the time.  This roast was slightly less than 5 pounds but we had plenty leftover.  Keeping in mind that it was just two of us eating this size roast.

This was our Christmas dinner and I'm happy to say that I will most likely repeat this again next Christmas.  It was a wonderful change to the typical ham or turkey and equally easy to prepare.


There's a lot of rubbing of seasonings and such, you really want every surface covered.


Doesn't that look amazing?!


I used the pan drippings to make a pan gravy as well.  Use a chicken broth so the taste of the lamb still comes through.


My mouth is watering,  I might need to make this again on a regular basis.

Herb and Garlic Roasted Leg of Lamb
Recipe found at About.com

Ingredients

  • About 5lb leg of lamb
  • juice of one lemon, about 2 Tbsp
  • 1 to 2 cloves of garlic, cut into slivers
  • 1 clove garlic, minced
  • 1 1/2 to 2 tsp dried rosemary
  • 1 tsp thyme
  • 1 tsp salt
  • 1/4 tsp pepper
Directions
  1. Rinse the leg of lamb in cold water and dry with a towel. 
  2. Cover the roast with lemon juice, use your hands to rub it all over. 
  3. Make tiny slits into the fatty side of the leg and push a sliver of garlic into each cut. 
  4. Mix the minced garlic, rosemary, thyme, salt and pepper together and rub into the meat.  Use your hands to thoroughly cover the roast. 
  5. Put the roast on a roasting rack and put into a preheated 325 degree oven for 25-30 minutes per pound. 
  6. Cook until a meat thermometer reads 145 to 165 depending on how done you like it.  
  7. I roasted mine to about 155, as seen in the photo's above. 

January 4, 2013

Homemade Rice and Roni


I've been on a crafty binge lately (to be posted later) and even though I'm not great at it, I still love it.  I'm also desperately trying to lose all the weight I gained over the holiday's.  I'm down 2.5 pounds in one day doing Dr. Oz's three day body cleanse. Two more days to go and the weight loss is really encouraging me to keep it up.  I know a body cleanse isn't really for weight loss but if it's an added bonus I'm all for it.  So far it's pretty painless, although I'm not a fan of the lunch time smoothie but I'm still chugging it down.

I can't wait to eat this rice and roni again.  It was so super good and much better than the kind you buy in the box.  Great side dish!


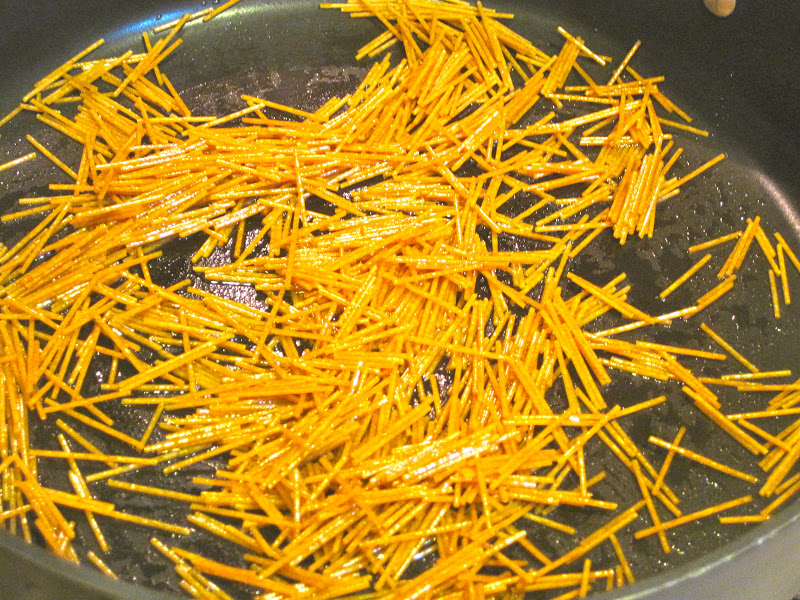
Just break some spaghetti noodles into small pieces and brown up in a pan. 


Add the other ingredients and let simmer until the moisture is absorbed. 


Perfect for a busy weeknight meal because it's less than 30 minutes!  You could even squeeze in some veggies like peas or carrots (or both)!  Don't forget you can also cut up some chicken and mix it all together for a super quick meal on the go!

Homemade Rice and Roni
Recipe from Paula Deen

Ingredients

  • 1 Tbsp vegetable oil
  • 1/2 pound spaghetti, broken into small pieces
  • 1 cup long grain rice
  • 1 small onion, chopped
  • 1 tsp dried parsley
  • 2 cups chicken or beef broth
Directions

  1. Break the noodles into small pieces (about 1/2 to 1 inch) and place in a large fry pan with the oil.
  2. Cook the noodles over medium heat until they begin to brown slightly. 
  3. Add the remaining ingredients and cook for about 20 minutes until the rice has absorbed all the liquid. Fluff with a fork.
  4. Salt and pepper as desired. 

January 2, 2013

Top 5 of 2011

I know I'm a year late here but better late than never right? I just wanted to start a little tradition of getting the top 5's out for the New Year so let's just pretend for a minute that you don't notice this is a year old OK? :)  Thanks!


Red Velvet Crepe Cake

To say that this recipe is a favorite of 2011 is a slight misrepresentation of it's importance, because it is in fact the most viewed recipe on my blog up until the present time.  I'm not surprised, it was an incredible cake to look at, and to eat.  In case you're wondering, this recipe makes two cakes so you can  share one and keep one for yourself!


Ina Garten Sesame Noodles

Ina Garten never lets me down.  Her recipes turn out perfectly for me every time and I always get rave reviews.  I did modify this recipe but I still think it's awesome!


Bacon Wrapped Smokies with Brown Sugar

Talk about the perfect party food and someone will always mention the cute little "hot dogs" that everyone loves.  They are the perfect sized appetizer for a party.  Just a toothpick and you're all set for a on the go nibble.  Add bacon and brown sugar and you may have just created the perfect snack!


Redneck Rigatoni

Thanks Dad!  This is one of his creations and it's been viewed plenty of times.  People love how simple and easy it is and what's more redneck then canned cheese!


Chocolate Swiss Roll with Marshmallow Frosting

This was a delicious creation!  The marshmallow frosting really puts it over the top.  The cake is so chocolatey that the frosting is the perfect accompaniment.  It was fun to make and even funner to eat!